MyEye4DIY.com

"My Eye for DIY" - No Rules, Just Guidelines!

  • Blog
  • DIY Project Tutorials
    • Home Decor
    • Room Makeover
    • Furniture Rehab
    • Kids Home Decor
    • Event Decorating Ideas
    • DIY Workshops
    • DIY Projects With eHow
  • Lifestyle
    • Beauty
    • Fashion
  • MyEye4DIY TV
  • About
  • Contact

Jul 8

Creating Ombre Wall Art

As an Amazon Associate I earn from qualifying purchases.

Creating your own Ombre Wall Art isn’t as hard as it may seem.  With a few easy to follow steps, you’ll be creating brand new wall art for your home in no time.

ombre wall art
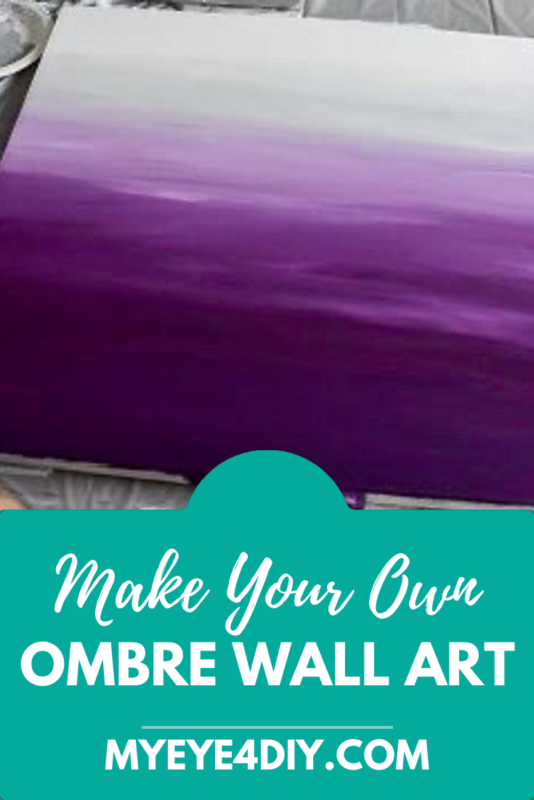
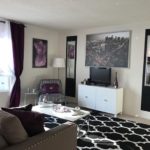
Many of you have seen this purple artwork in some of my other videos and asked me about it. Like many of you, I’m not a painter! But wait till you see how EASY it is to create this beautiful piece of WALL ART.
I like to save money, so I’m repurposing an old canvas print I no no longer use by painting it white. Saved me about $40 bucks, these bigger canvas’s can get pretty pricey!
You can also skip this step & buy a new canvas.

What You’ll Need:

– An old Canvas
– White sample paint for Canvas
– A paint roller
– White Acrylic paint
– 2 shades of purple Acrylic paint
– Gray Acrylic paint
– Paint Brushes
– Mod Podge

creating ombre wall art

STEP 1: REPAINT CANVAS

To begin, wipe any dust and dirt from the canvas with a paper towel. Next, using my white sample paint along with my roller I applied two coats of paint to the canvas. Viola…a fresh slate to begin my fancy ombre wall art!

STEP 2: APPROACH

To create my Ombre design, I’ll go from light to dark. I’ll start with white, then gray and working my way down using my 4 shades of purple, going from lightest to darkest.

STEP 3: PREPARE PAINTS

I’m not a painter so I don’t have fancy paint supplies. I poured my paint onto paper plates. It’s all about getting the job done…right?!?

STEP 4: DIVIDE CANVAS INTO SECTIONS

I’m painting 6 shades onto my canvas so I divided the canvas evenly into 6 sections as a guide to show me where to begin and end with each color. It’s a good reference point as you go along.

creating ombre wall art

NOTE:
Acrylic Paint drys quickly so you want to make sure to work fast when applying to canvas.

STEP 5: BEGIN PAINTING (STARTING WITH WHITE SECTION)

WHITE SECTION

Since no blending is needed for this first section I just poured my white paint onto the canvas. Using my 3 inch brush, I applied the white paint in a back and forth motion to evenly distribute the paint. I let the extra paint hang over the edge with each one of these colors so I can apply that paint to the sides later.

creating ombre wall art

creating ombre wall art

GRAY SECTION

In the second section, I used Slate Gray and Silver. I started by applying the more saturated gray toward the bottom and then used a back and forth stroke to spread & blend the paint.  As I moved up, I applied a little white paint to my brush to wash out some of the gray to Blend the white and gray sections into one another. I also took a little of the gray and used that to blend the purple and gray together for a better finish.

1ST SHADE OF PURPLE

Next, I created my first shad of purple by mixing Deep Violet and White. I blended a lot of white paint in this section to create the lighter shade.
Beginning with the more saturated color toward the bottom, I mixed in my white to turn it into a lighter shade of purple. With a back and forth motion, I started from the bottom and worked my way up to the gray continuing to go back and forth to achieve the lighter purple color you see here.

creating ombre wall art

With the thick side of my brush I turned it over and used the thin side using different strokes to try and create little lines and patterns. For blending, I just keep going back and forth with the thinner part of my brush towards the top to blend the purple and gray together. Then, I took a little of the gray and used that to blend the purple and the gray together for a better finish.

2ND SHADE OF PURPLE

For the second purple layer, I used the same color, deep violet but I mix in less of the white paint. This keeps more of the true color, making this layer slightly darker than the shade above.
Again, painting in a back and forth motion, applying more paint at the bottom of this section to create a darker shade.
As I continue to go back and forth the brush spreads the paint out, thinning it and lightening the color, this really helps blend this section into the lighter shade above as we move to the top of this section. I did dab a LITTLE bit of white as I got to the top to help blend these two shades of purple together.

creating ombre wall art

3RD SHADE OF PURPLE

As I apply the third shade of purple, I begin at the bottom of the of the section I measured in the beginning and apply a heavy coat of the Deep Violet color to the canvas. I did not apply any white to this section. I’m using the true color, it’s really pretty!

creating ombre wall art

4TH SHADE OF PURPLE

I used prism violet for the last shade of purple. Again, I did not mix any white with this color.

STEP 6: BLEND EDGES OF PAINTING

After applying my last shade of purple I just painted the bottom edge with that same shade of Prism Violet.

creating ombre wall art

As I was painting the canvas I let all my paints bleed over the sides. Using my 1 inch brush and began to blend off my purples starting from the lightest color and working my way down the edge of the canvas to the darkest shade. This same process was repeated on the other side as well.
Then, I took my 2 inch brush and blended my white and gray colors starting with white and working my way down to the gray.
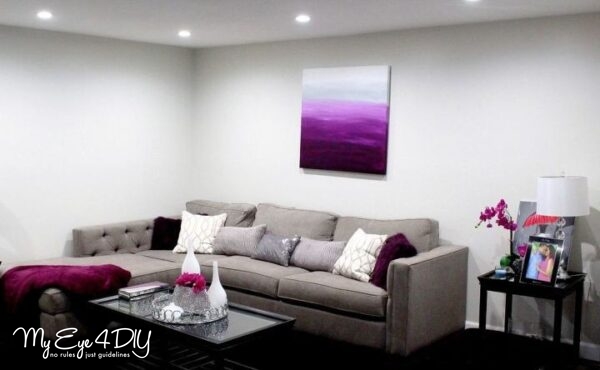
creating ombre wall art

creating ombre wall art

ALL DONE!
That’s how I did it. I love the way it turned out! Let me know if you all create this project, what colors you use and where you hang it in your home!

creating ombre wall art

Love this project?  Next step, easily turn your New Wall Art into a Wall Quote!

Amazon and the Amazon logo are trademarks of Amazon.com, Inc, or its affiliates.

Related Posts

  • 6 Steps to Painting a Striped Accent Wall!6 Steps to Painting a Striped Accent Wall!
  • Turn Your Favorite Quote into Wall Art Using Transfer PaperTurn Your Favorite Quote into Wall Art Using Transfer Paper
  • Cozy Couch Edition Part 1: Cutting Board Turned Sofa Arm TrayCozy Couch Edition Part 1: Cutting Board Turned Sofa Arm Tray
  • Pool Noodle Hacks – Rainbow Wall ArtPool Noodle Hacks – Rainbow Wall Art
  • “DIY MY HOUSE” Living Room!“DIY MY HOUSE” Living Room!
  • Decorating with Fringe! Endless possibilities…Decorating with Fringe! Endless possibilities…

Share this:

  • Facebook
  • Pinterest
  • Twitter
  • Google
  • More
  • LinkedIn
  • Email

Filed Under: Decorating & Crafting Projects, Home Decor, Living Room DIY, Project Tutorials, Videos | 1 Comment

« Tricycle Diaper Cake Tutorial
Bathroom Counter Decor Ideas »

Trackbacks

  1. Add Texture & Style To A Bookcase With Self Adhesive Velvet says:
    at 10:34 am

    […] Creating Ombre Wall Art […]

    Reply

Leave a Reply Cancel reply

Search The Blog

Read More

Let’s Connect!

  • Email
  • Facebook
  • Instagram
  • Pinterest
  • YouTube

Subscribe to Posts Via Email

Watch MyEye4DIY TV


More From MyEye4DIY TV!


youtube

Sponsorship

info@myeye4diy.com

Instagram

The WOW factor your kids room may be missing! I ha The WOW factor your kids room may be missing! I have a cool hack that will instantly brighten your kids room or nursery and help them learn! ⠀⠀⠀⠀⠀⠀⠀⠀⠀
⠀⠀⠀⠀⠀⠀⠀⠀⠀
Head over to the blog to see how you can turn pool noodles into a huge rainbow for your home decor! When it’s done, you can hang it up in your children’s bedroom or play room for that WOW factor its been missing.⠀⠀⠀⠀⠀⠀⠀⠀⠀
⠀⠀⠀⠀⠀⠀⠀⠀⠀
It has actually been a great learning tool for our girls as well; helping them learn colors and even a little about weather. Over time, they've slowly started to identify the alphabet letters I added underneath. ⠀⠀⠀⠀⠀⠀⠀⠀⠀
⠀⠀⠀⠀⠀⠀⠀⠀⠀
Do you like decorating with color? Let me know what other Kid inspired DIY projects you'd like to see!⠀⠀⠀⠀⠀⠀⠀⠀⠀
⠀⠀⠀⠀⠀⠀⠀⠀⠀
Click link in bio for blog post. ⠀⠀⠀⠀⠀⠀⠀⠀⠀
#homedecor #Myeye4diy #DIYwallart #Rainbowwallart #weekenddiy #DIYprojects #wallart #Kidsroom #playroom #DIYRainbow #Rainbowhomedecor #poolnoodlehack #Ikeahack #Nursery #nurserydecor #kidsdecorations
Top 10 Indoor Kid Activities! It's not my usual DI Top 10 Indoor Kid Activities! It's not my usual DIY Home Decor project, but I was thinking about my fellow moms and want to share some of the indoor activities that have been keeping our family sane during this crazy time. You could literally start the fun immediately after reading this.
:
:
:
:
:
:
#Myeye4diy #homedecor #diy #diycrafts #momlife #stayathomemoms #stayathomemom #stayathomemomma  #todlerplayideas #toddlerplay #playathome #makewayforplay
#indooractivitiesforkids
#counting #sensoryplayideas #sensoryplay #sensorybin 
#finemotoractivity #trayoftheday #colors  #ourfunfactory #createmakeandplay #preschoolactivities #preschoolathome #earlyyearsactivities #earlychildhoodeducation #earlylearning #summerplay #summeractivitiesforkids #lockdownactivitiesforkids
Hey Everyone! It’s a beautiful day to grab suppl Hey Everyone! It’s a beautiful day to grab supplies for a ‘Weekend DIY’! Not an experienced painter, NOT A PROBLEM! I’m not either! But I love how my weekend project came out and want to share this short tutorial to help you step up your wall art. 
:
What colors are catching your eye these days?
:
Comment below with any questions and please tag me with your projects! 

Click link in bio for blog post. 
#homedecor #Myeye4diy #DIYwallart #ombrewallart #weekenddiy #DIYprojects #wallart #purplehomedecor #diy
When we can’t rely on our current Leadership to When we can’t rely on our current Leadership to step up in the right way look who’s right here to help mobilize, encourage and engage with us!! See the full video and ongoing conversation at Obama.org or @obamafoundation
Challenge yourself! Speak up!! It’s past time!!! Challenge yourself! Speak up!! It’s past time!!! Enough is enough! What will it take? #blacklivesmatter
Some ways you can use your voice....#blacklivesmat Some ways you can use your voice....#blacklivesmatter
BlackoutTuesday. Use this day to find a way to use BlackoutTuesday. Use this day to find a way to use your voice!! Black Lives Matter
Upgrade an ordinary old bookcase into a velvet tro Upgrade an ordinary old bookcase into a velvet tropical gem! Watch Live today at 4p PT on Facebook @hometalk.:
:
:
:
:
:
#homesecor #diyhomesecor #myeye4diy #bookcasemakeover #tropicalbookcase #contactpaper #velvetdiy #tropicalfurniture #tropical #diy #furnituremakeovers
Easy DIY No-Sew Pillows! Learn 2 techniques today Easy DIY No-Sew Pillows! Learn 2 techniques today 4p PT on HometalkTV. Change up your pillow game for the spring! Video tutorial will be on their Facebook page and website. Click link in their bio @hometalk. :
:
:
:
:
#nosewpillow #decorativepillows #nosew #sequinpillow #reversablesequins #pillow #diypillow #homedecor #diyhomedecor #myeye4diy #socialdistancing #diy #diyprojects #stayhome #videotutorial #purplepillow
Follow on Instagram

Pinterest

Visit My Eye 4 DIY's profile on Pinterest.

Categories

Subscribe to Posts Via Email

  • Email
  • Facebook
  • Instagram
  • Pinterest
  • YouTube

Copyright © 2021 My Eye 4 DIY · Design by Melanie Anne Creative · Powered By Wordpress

loading Cancel
Post was not sent - check your email addresses!
Email check failed, please try again
Sorry, your blog cannot share posts by email.