MyEye4DIY.com

"My Eye for DIY" - No Rules, Just Guidelines!

  • Blog
  • DIY Project Tutorials
    • Home Decor
    • Room Makeover
    • Furniture Rehab
    • Kids Home Decor
    • Event Decorating Ideas
    • DIY Workshops
    • DIY Projects With eHow
  • Lifestyle
    • Beauty
    • Fashion
  • MyEye4DIY TV
  • About
  • Contact

Jul 6

6 Steps to Painting a Striped Accent Wall!

As an Amazon Associate I earn from qualifying purchases.

Hi Everyone!!
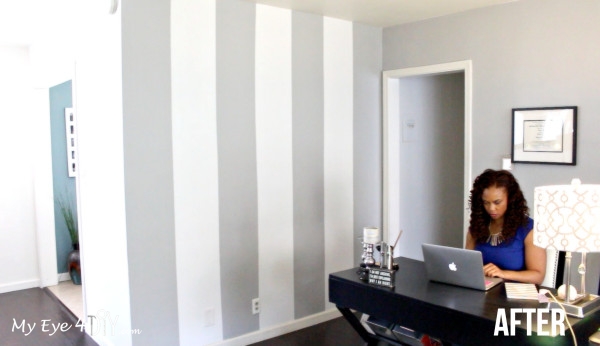
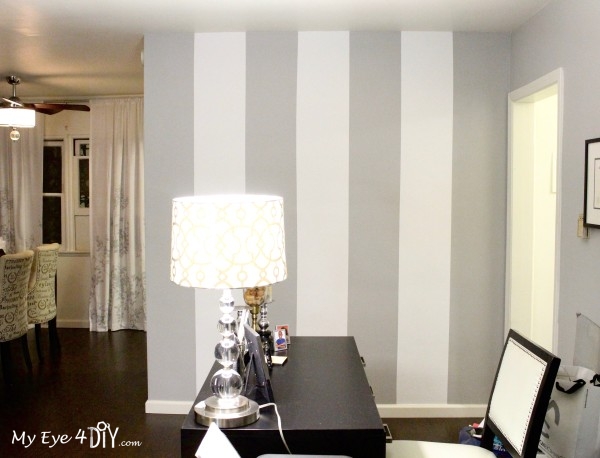
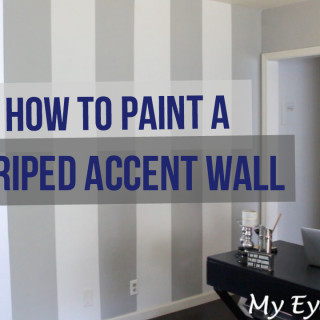
For this weeks tutorial, I’m going to show you how to create a Striped Accent Wall in episode 1 of my new vlog series “DIY My House”. These aren’t your typical horizontal wall stripes my friends! We’re going VERTICAL!!!  My friend Shavon wanted to have some fun by painting an accent wall in her living room but needed some help bringing out her inner DIY! Of course, I rushed right over!
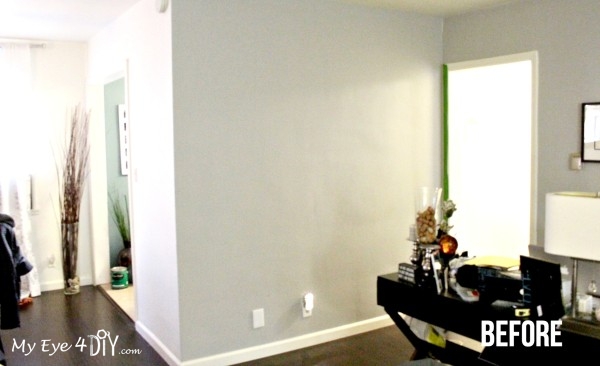
Accent walls are a great way to bring any room in your home to life. They provide a long-term benefit for minimal cost and really create a wow-factor when guests come over!  Take a look at the 6 steps we used to bring her wall to life!

The trick to creating this masterpiece is using two contrasting colors that will stand apart from the other walls. Lucky for us, the base coat of Shavon’s apartment walls are a nice light gray. We decided white stripes would be a great contrast color.

Here is What You’ll Need:
Screen Shot 2016-06-29 at 10.37.36 AM
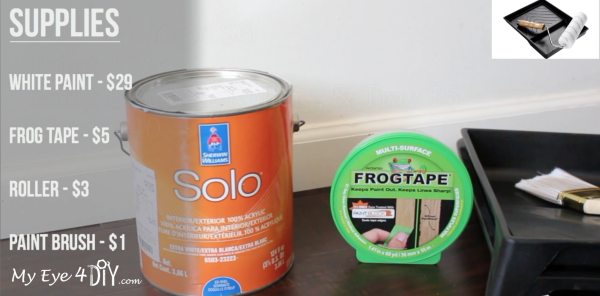
Wear something comfortable that you don’t mind getting dirty! No need to get paint on the good stuff!

Step 1: Measure Width of Wall & Draw Vertical Lines
When painting vertical stripes you want to measure the width of the wall first to determine the number of stripes you would like to paint. Some people like thin stripes and others like wider stripes. Our wall was 91 inches across.across
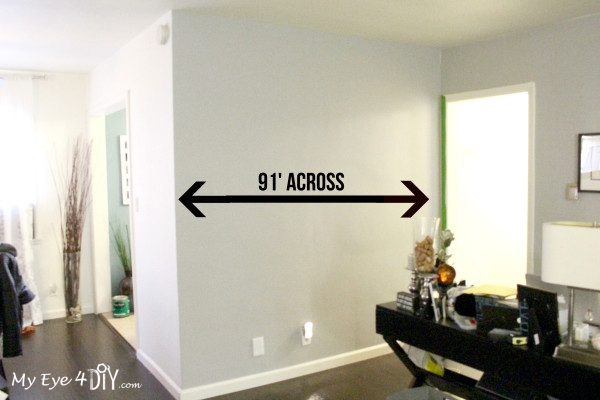
To keep things easy, we divided that number by seven, for a total of seven stripes at 13 inches wide.
We then used a measuring stick with a level to draw the vertical lines.
(You can do this a number of ways but I find this method to be easiest to assure straight lines.) levelhead-type-80a-2-rehab-remodel-restoreStart at the top of the wall and measure 13 inches across, mark it with pencil. Then turn stick around and place it on top of the mark you just made and drew a line going vertical down the wall. Once you reach the bottom, measure 13 inches across and mark with pencil. Then take your stick and place it on the marked line and begin drawing a vertical line up the wall until you reach the top. Repeat this step all the way across until you have 7 stripes.
DIY TIP: You can make the stripes as thick or thin as you like, it’s all a matter of personal preference. If you are looking to do less work, thicker stripes will work well for you! They require less lines to draw and less taping.

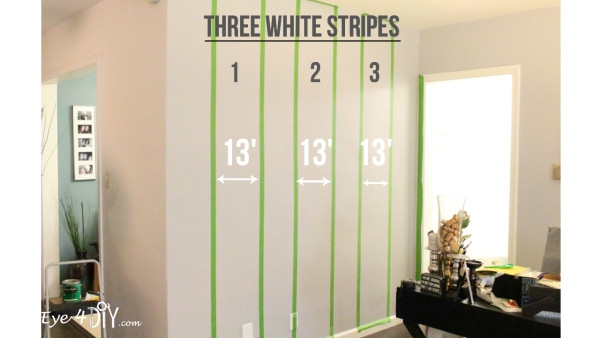
Step 2: Tape Wall with Painters Tape
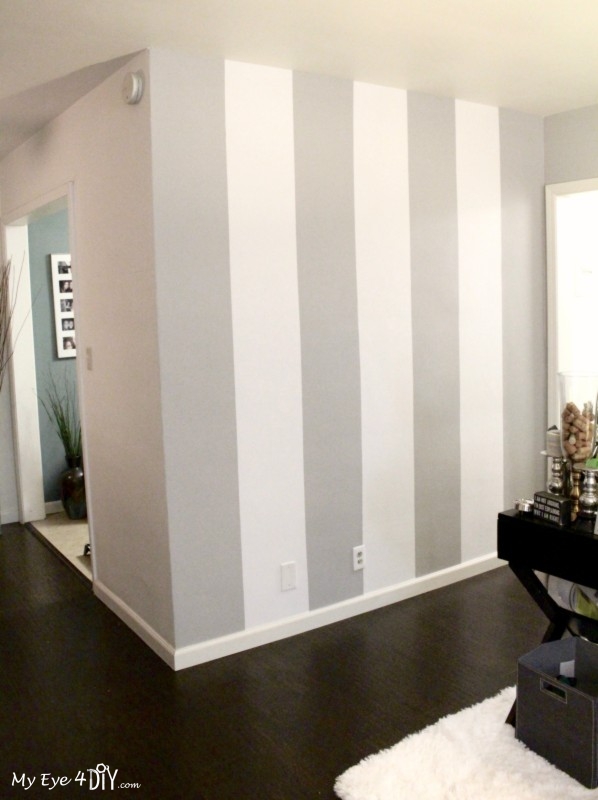
Now that you’ve drawn all your vertical lines, identify the stripes you will be painting, usually every other stripe. We decided to paint 3 white stripes, which means the first stripe would be the existing wall color (light gray), then white, then gray, white, gray, white, gray; for a total of 7 stripes.  Apply painters Frog Tape along the first line drawn on the wall. Be sure to apply the tape so the majority is resting on the gray strip you are not paining. Otherwise you won’t paint the full 13 inches of your white stripes.
You should also apply painters tape to the ceiling and any floor molding to assure crisp lines and to avoid getting paint of another color on those areas! Trust me, it happens, no matter how good you are!
(Four stripes remained the light gray color of the wall and the other three we painted white.)1-7white stripes

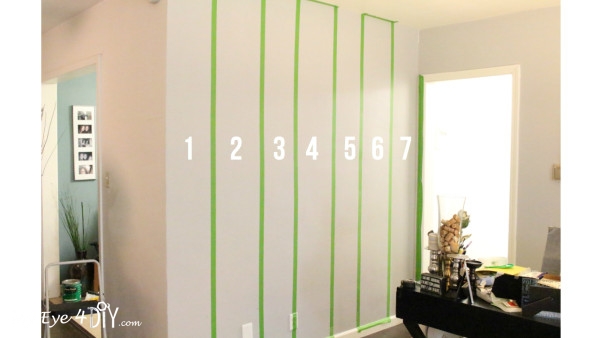
DIY TIP: Press the tape firmly against wall from top to bottom to assure crisp lines once paint drys.  You don’t want any paint to seap underneath causing tathered edges.

STEP 3: Unscrew wall fixtures.
If there are any electrical wall fixtures in your path, remove them before painting.

STEP 4: Begin Painting!!!
(One supply item not mentioned above is a drop cloth, be sure to lay one down in the painting area to place your supplies on and protect floors from paint.)wall creases1
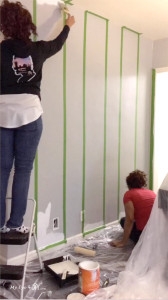
– Stir your paint so all the elements are not settle at the bottom of the can.
– Use your paint brush to apply paint to the creases at the top and bottom of the wall. The brush helps to apply paint to the areas the roller can not reach.
– Take your roller to gently apply paint to the 1st striped area. Repeat this step for each stripe.
– Allow the paint to dry and apply a second coat to each stripe.
– Allow stripes to dry completely for several hours. I like to leave it over night just to be safe.

DIY TIPS:
1) Do NOT apply too much paint to roller or it will bleed through the painters tape and give you messy lines!
2) Don’t forget to rinse your brushes!! You can use them again.
3) Seal your can of paint if there is any left over to use for the next project!

Step 5: Remove Painters Tape
Once stripes are COMPLETELY DRY remove painters tape by gently peeling in a downward direction.

Step 6: Clean Up
Throw the tape and painting drop cloth away.
You will now have a beautiful accent wall to be proud of for years to come!

before1after 1wall 2IMG_7692 You can take it one step further and apply an inspirational quote using a wall stencil if you like.

Watch the video above to see our tutorial in action. This is a fun project for the weekend that’s super inexpensive and easy to do!
Try it! Send us PICTURES, we want to see your works of art!

Until the next DIY project, have a great week!

Amazon and the Amazon logo are trademarks of Amazon.com, Inc, or its affiliates.

Related Posts

  • “DIY MY HOUSE” Living Room!“DIY MY HOUSE” Living Room!
  • DIY Scented Floral Centerpiece Under $5DIY Scented Floral Centerpiece Under $5
  • Decorating with Fringe! Endless possibilities…Decorating with Fringe! Endless possibilities…
  • Creating Ombre Wall ArtCreating Ombre Wall Art
  • Turn Your Favorite Quote into Wall Art Using Transfer PaperTurn Your Favorite Quote into Wall Art Using Transfer Paper
  • Cozy Couch Edition Part 1: Cutting Board Turned Sofa Arm TrayCozy Couch Edition Part 1: Cutting Board Turned Sofa Arm Tray

Share this:

  • Facebook
  • Pinterest
  • Twitter
  • Google
  • More
  • LinkedIn
  • Email

Filed Under: Decorating & Crafting Projects, Living Room DIY, Project Tutorials, Room Ideas, Room Makeover, Videos | 2 Comments

« DIY Manicures: Easy as 1…2…3…
DIY Holiday Centerpiece »

Comments

  1. Jo Gunter says

    at 3:22 pm

    Did you ever do stenciling? I have a long hallway that needs help a,

    Reply
    • kalia200 says

      at 6:46 pm

      Hi Jo! You can actually do wall stripes without painting as well using contact paper. Take a look at this Facebook live tutorial I did on it for Hometalk. https://www.facebook.com/Hometalk/videos/2081452648538947/

      Reply

Leave a Reply Cancel reply

Search The Blog

Read More

Let’s Connect!

  • Email
  • Facebook
  • Instagram
  • Pinterest
  • YouTube

Subscribe to Posts Via Email

Watch MyEye4DIY TV


More From MyEye4DIY TV!


youtube

Sponsorship

info@myeye4diy.com

Instagram

The WOW factor your kids room may be missing! I ha The WOW factor your kids room may be missing! I have a cool hack that will instantly brighten your kids room or nursery and help them learn! ⠀⠀⠀⠀⠀⠀⠀⠀⠀
⠀⠀⠀⠀⠀⠀⠀⠀⠀
Head over to the blog to see how you can turn pool noodles into a huge rainbow for your home decor! When it’s done, you can hang it up in your children’s bedroom or play room for that WOW factor its been missing.⠀⠀⠀⠀⠀⠀⠀⠀⠀
⠀⠀⠀⠀⠀⠀⠀⠀⠀
It has actually been a great learning tool for our girls as well; helping them learn colors and even a little about weather. Over time, they've slowly started to identify the alphabet letters I added underneath. ⠀⠀⠀⠀⠀⠀⠀⠀⠀
⠀⠀⠀⠀⠀⠀⠀⠀⠀
Do you like decorating with color? Let me know what other Kid inspired DIY projects you'd like to see!⠀⠀⠀⠀⠀⠀⠀⠀⠀
⠀⠀⠀⠀⠀⠀⠀⠀⠀
Click link in bio for blog post. ⠀⠀⠀⠀⠀⠀⠀⠀⠀
#homedecor #Myeye4diy #DIYwallart #Rainbowwallart #weekenddiy #DIYprojects #wallart #Kidsroom #playroom #DIYRainbow #Rainbowhomedecor #poolnoodlehack #Ikeahack #Nursery #nurserydecor #kidsdecorations
Top 10 Indoor Kid Activities! It's not my usual DI Top 10 Indoor Kid Activities! It's not my usual DIY Home Decor project, but I was thinking about my fellow moms and want to share some of the indoor activities that have been keeping our family sane during this crazy time. You could literally start the fun immediately after reading this.
:
:
:
:
:
:
#Myeye4diy #homedecor #diy #diycrafts #momlife #stayathomemoms #stayathomemom #stayathomemomma  #todlerplayideas #toddlerplay #playathome #makewayforplay
#indooractivitiesforkids
#counting #sensoryplayideas #sensoryplay #sensorybin 
#finemotoractivity #trayoftheday #colors  #ourfunfactory #createmakeandplay #preschoolactivities #preschoolathome #earlyyearsactivities #earlychildhoodeducation #earlylearning #summerplay #summeractivitiesforkids #lockdownactivitiesforkids
Hey Everyone! It’s a beautiful day to grab suppl Hey Everyone! It’s a beautiful day to grab supplies for a ‘Weekend DIY’! Not an experienced painter, NOT A PROBLEM! I’m not either! But I love how my weekend project came out and want to share this short tutorial to help you step up your wall art. 
:
What colors are catching your eye these days?
:
Comment below with any questions and please tag me with your projects! 

Click link in bio for blog post. 
#homedecor #Myeye4diy #DIYwallart #ombrewallart #weekenddiy #DIYprojects #wallart #purplehomedecor #diy
Upgrade an ordinary old bookcase into a velvet tro Upgrade an ordinary old bookcase into a velvet tropical gem! Watch Live today at 4p PT on Facebook @hometalk.:
:
:
:
:
:
#homesecor #diyhomesecor #myeye4diy #bookcasemakeover #tropicalbookcase #contactpaper #velvetdiy #tropicalfurniture #tropical #diy #furnituremakeovers
Easy DIY No-Sew Pillows! Learn 2 techniques today Easy DIY No-Sew Pillows! Learn 2 techniques today 4p PT on HometalkTV. Change up your pillow game for the spring! Video tutorial will be on their Facebook page and website. Click link in their bio @hometalk. :
:
:
:
:
#nosewpillow #decorativepillows #nosew #sequinpillow #reversablesequins #pillow #diypillow #homedecor #diyhomedecor #myeye4diy #socialdistancing #diy #diyprojects #stayhome #videotutorial #purplepillow
Since we’re all home now, it’s a good time to Since we’re all home now, it’s a good time to get creative...let me show you how to make a kids kitchen set out of a few supplies you probably have around the house! See my full tutorial on eHow.com :
:
:
:
#diyKitchenplayset #diycardboardkitchen #kitchenplayset #myeye4diy #quarentine #toddlerlife #toddlerplay #toddlerplaytime #homeschool #kidplay #diy #howto #play #kitchendesign #diyprojects
Took this shoe storage up a notch...turned it into Took this shoe storage up a notch...turned it into an upholstered bench. Watch full tutorial on @hometalk TV today at 5p PT/8p ET. Follow my hometalk page for alerts on all my future videos! Thanks everyone! /
:
:
:
:
#myeye4diy #hometalk #homedecor #diy #diyvideos #diyexpert #diyblogger #shoestorage #diybench #diyhomedecor #upholsteredbench
‘I Love You’ Photo Frame tutorial today at 4p ‘I Love You’ Photo Frame tutorial today at 4p PT/7P ET. See how these wood letters transformed into this super cute Valentines Day Gift idea. :
:
:
#diyhomedecor #blogger #diyblogger #homedecor #valentines #valentinesgiftideas #valentinesgift #photoframes #woodletters #diy #myeye4diy #valentinesframe #cupid #interiordiy #interiordesign #interiordiyer
Turn Dollar Store supplies into a gorgeous DIY Riv Turn Dollar Store supplies into a gorgeous DIY River-Rock Welcome Doormat! See my full tutorial at eHow.com :
:
:
#diyhomedecor #diydoormat #diy #ehow #diyblogger #blogger #interiordesign #diyinterior #interiordiy #frontdoor #refresh #stones #diytutorial #homedecor
Follow on Instagram

Pinterest

Visit My Eye 4 DIY's profile on Pinterest.

Categories

Subscribe to Posts Via Email

  • Email
  • Facebook
  • Instagram
  • Pinterest
  • YouTube

Copyright © 2023 My Eye 4 DIY · Design by Melanie Anne Creative · Powered By Wordpress

loading Cancel
Post was not sent - check your email addresses!
Email check failed, please try again
Sorry, your blog cannot share posts by email.