MyEye4DIY.com

"My Eye for DIY" - No Rules, Just Guidelines!

  • Blog
  • DIY Project Tutorials
    • Home Decor
    • Room Makeover
    • Furniture Rehab
    • Kids Home Decor
    • Event Decorating Ideas
    • DIY Workshops
    • DIY Projects With eHow
  • Lifestyle
    • Beauty
    • Fashion
  • MyEye4DIY TV
  • About
  • Contact

Oct 17

Cozy Couch Edition Part 1: Cutting Board Turned Sofa Arm Tray

As an Amazon Associate I earn from qualifying purchases.

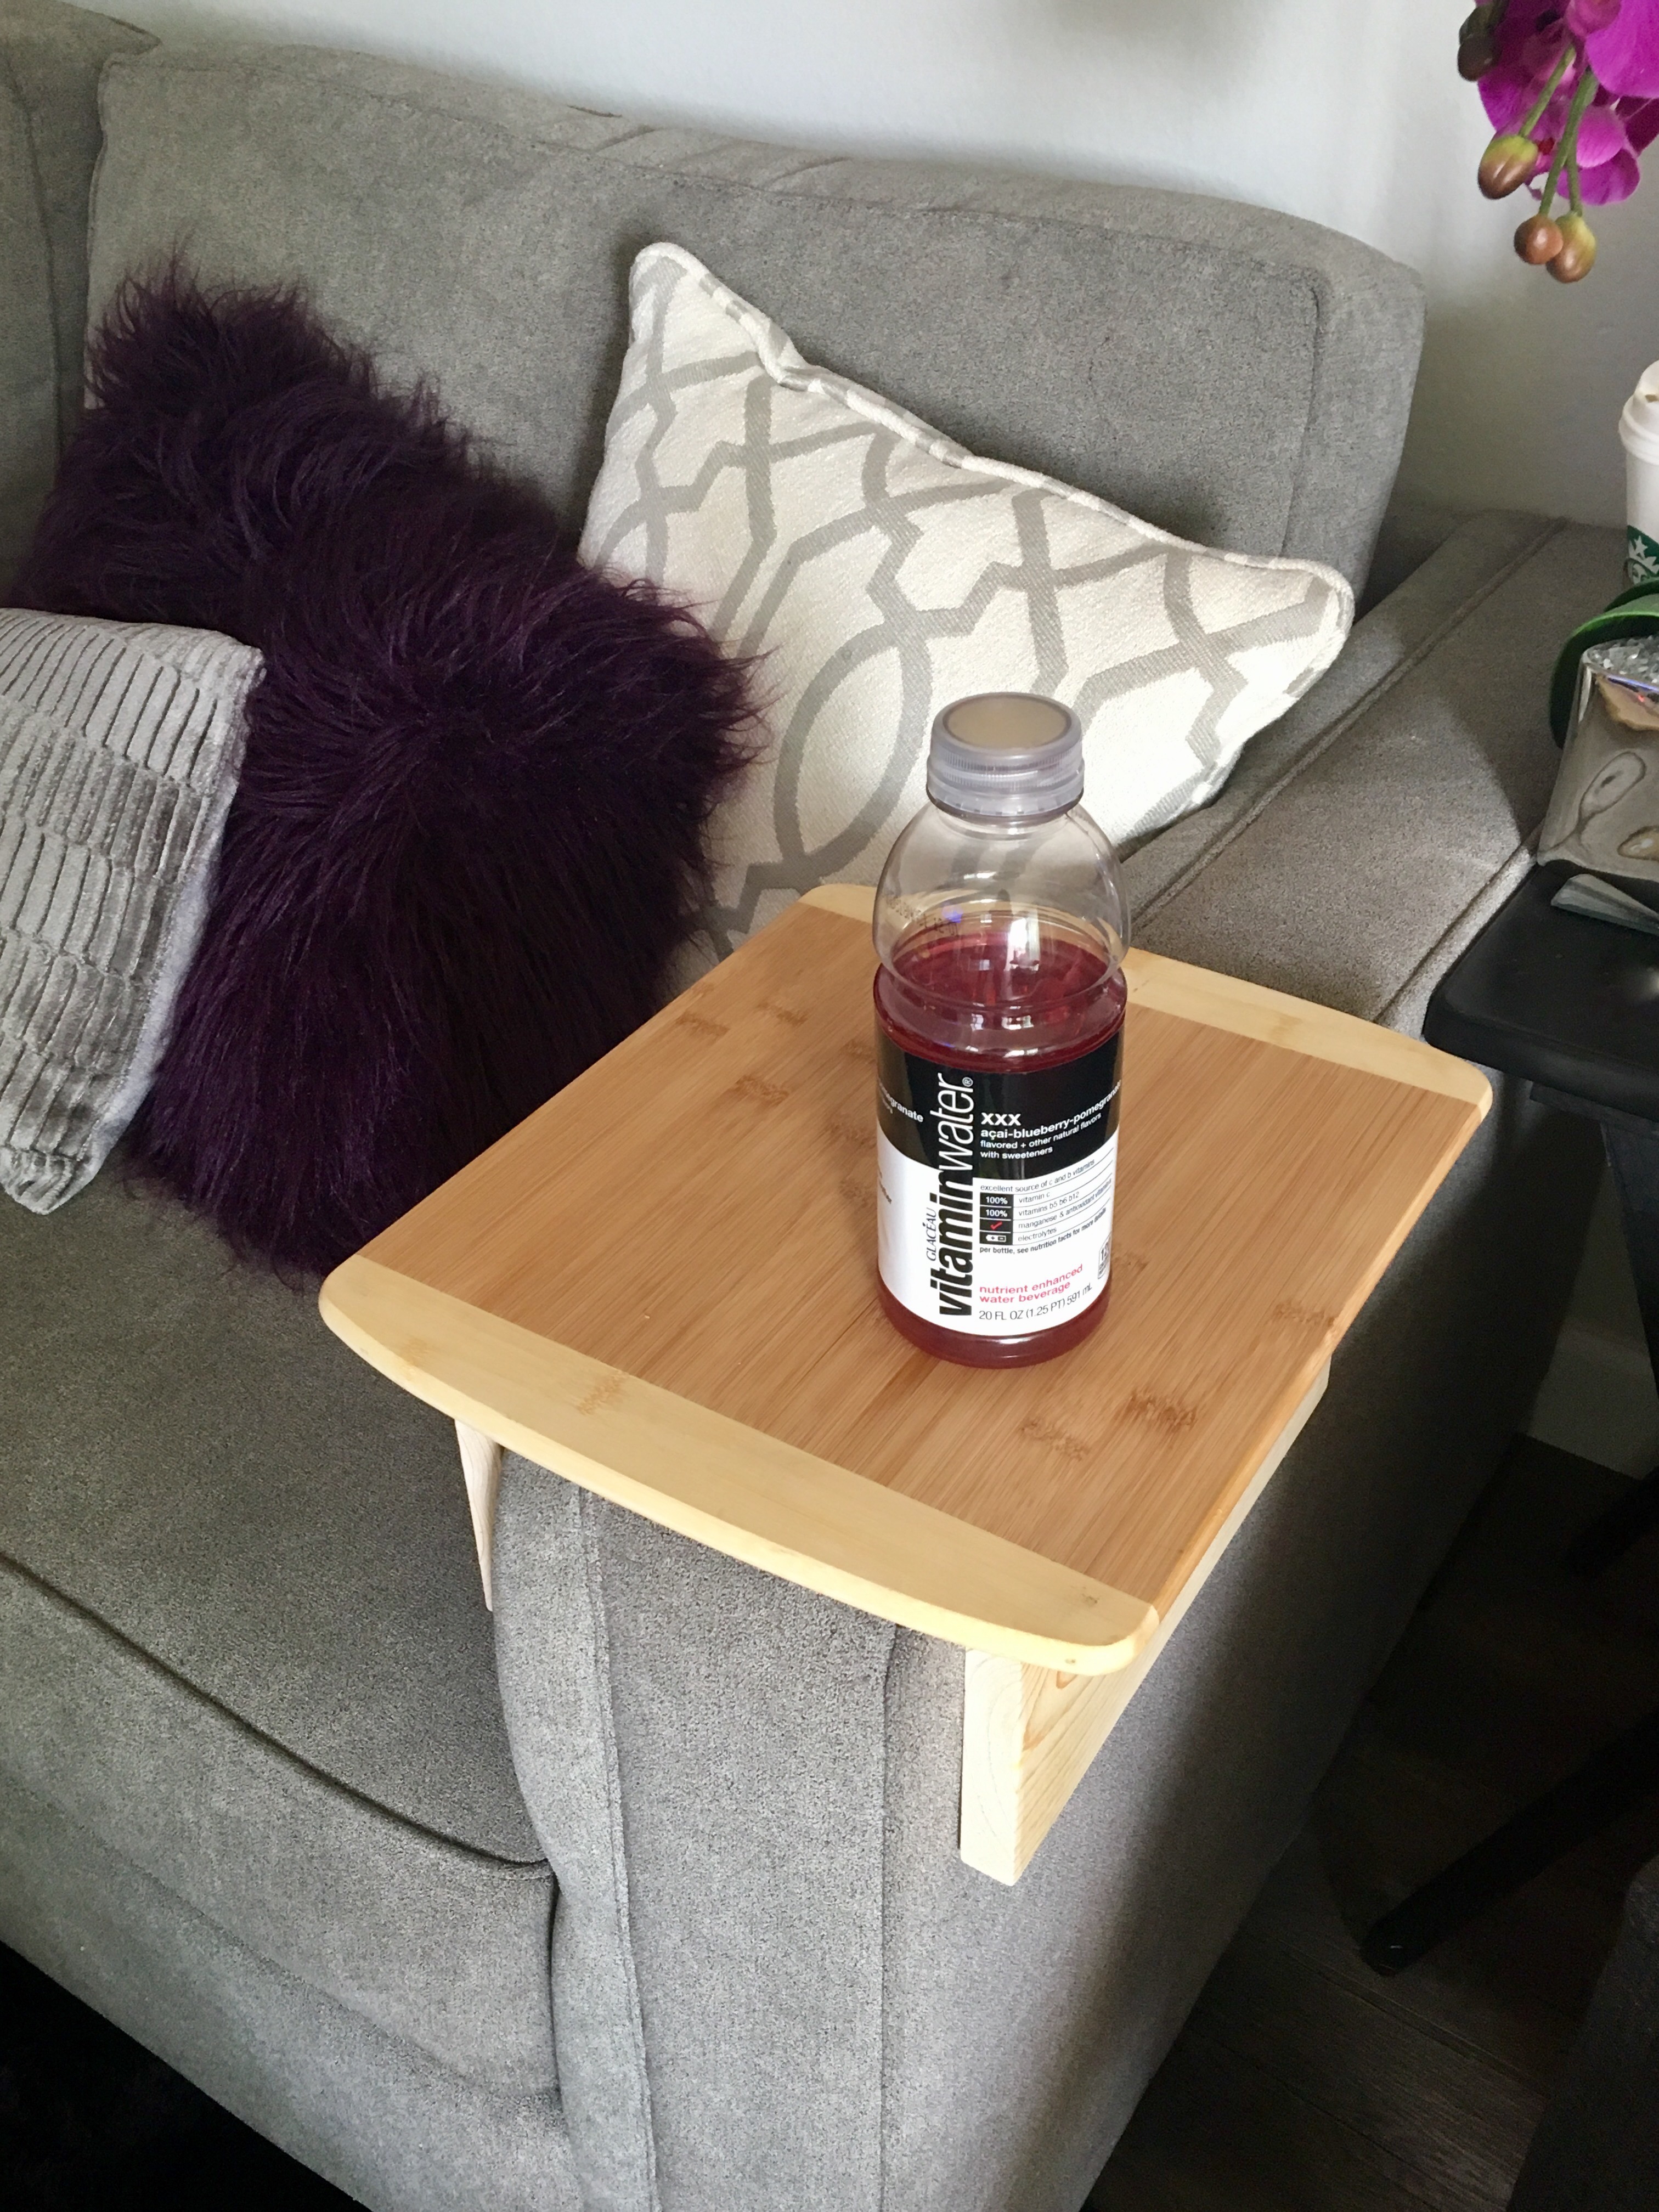
No matter the season it’s pretty safe to say that a Cozy Couch is something everyone loves! Whether watching a movie, your favorite show or Sports event, we all need to place to rest our food/drinks and the all so important remote control! Take a look at how you can turn a basic cutting board into a beautiful Sofa Arm Tray below. I’ll also show you how to get the look with 3 pieces of Pinewood. (Come back to see Part 2 where I will show you how to make your very own Pom-Pom blanket!)

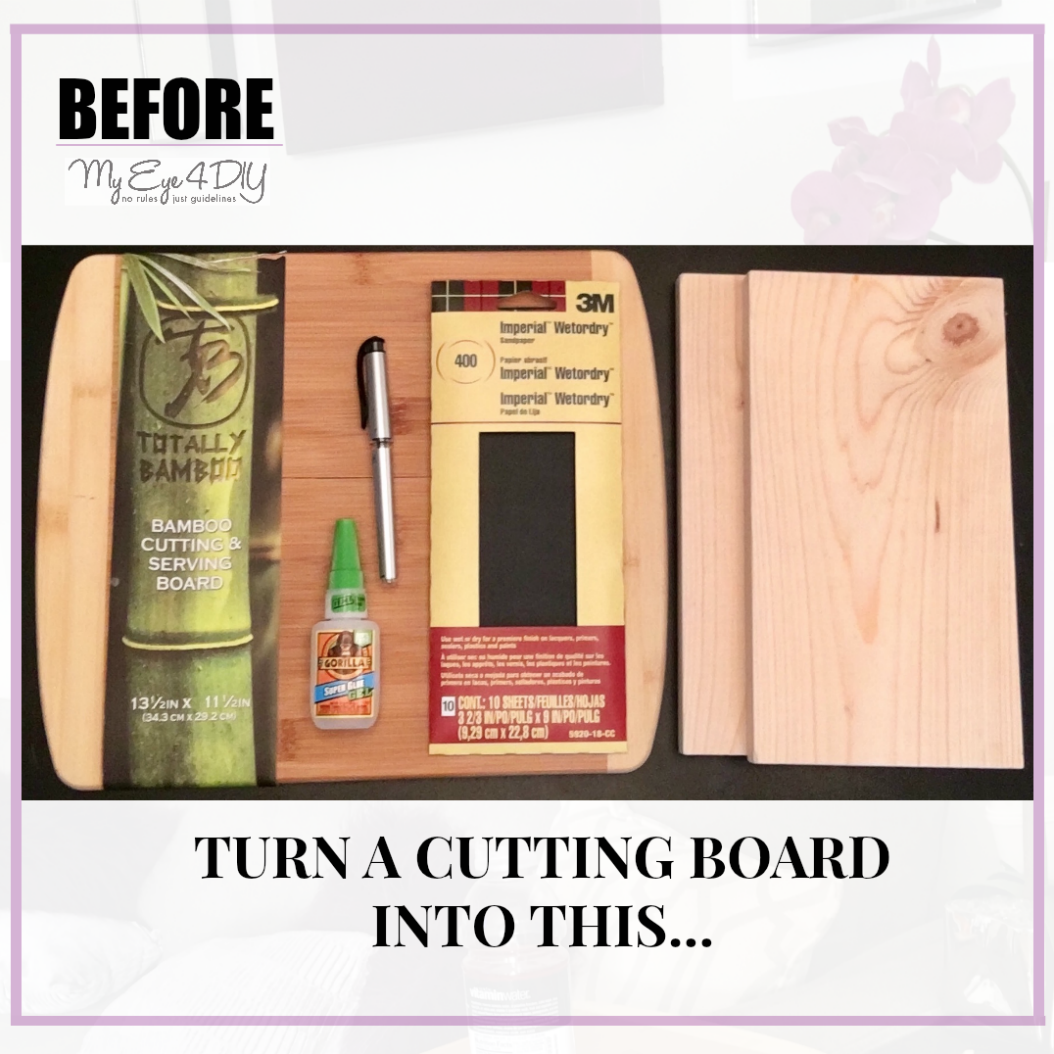
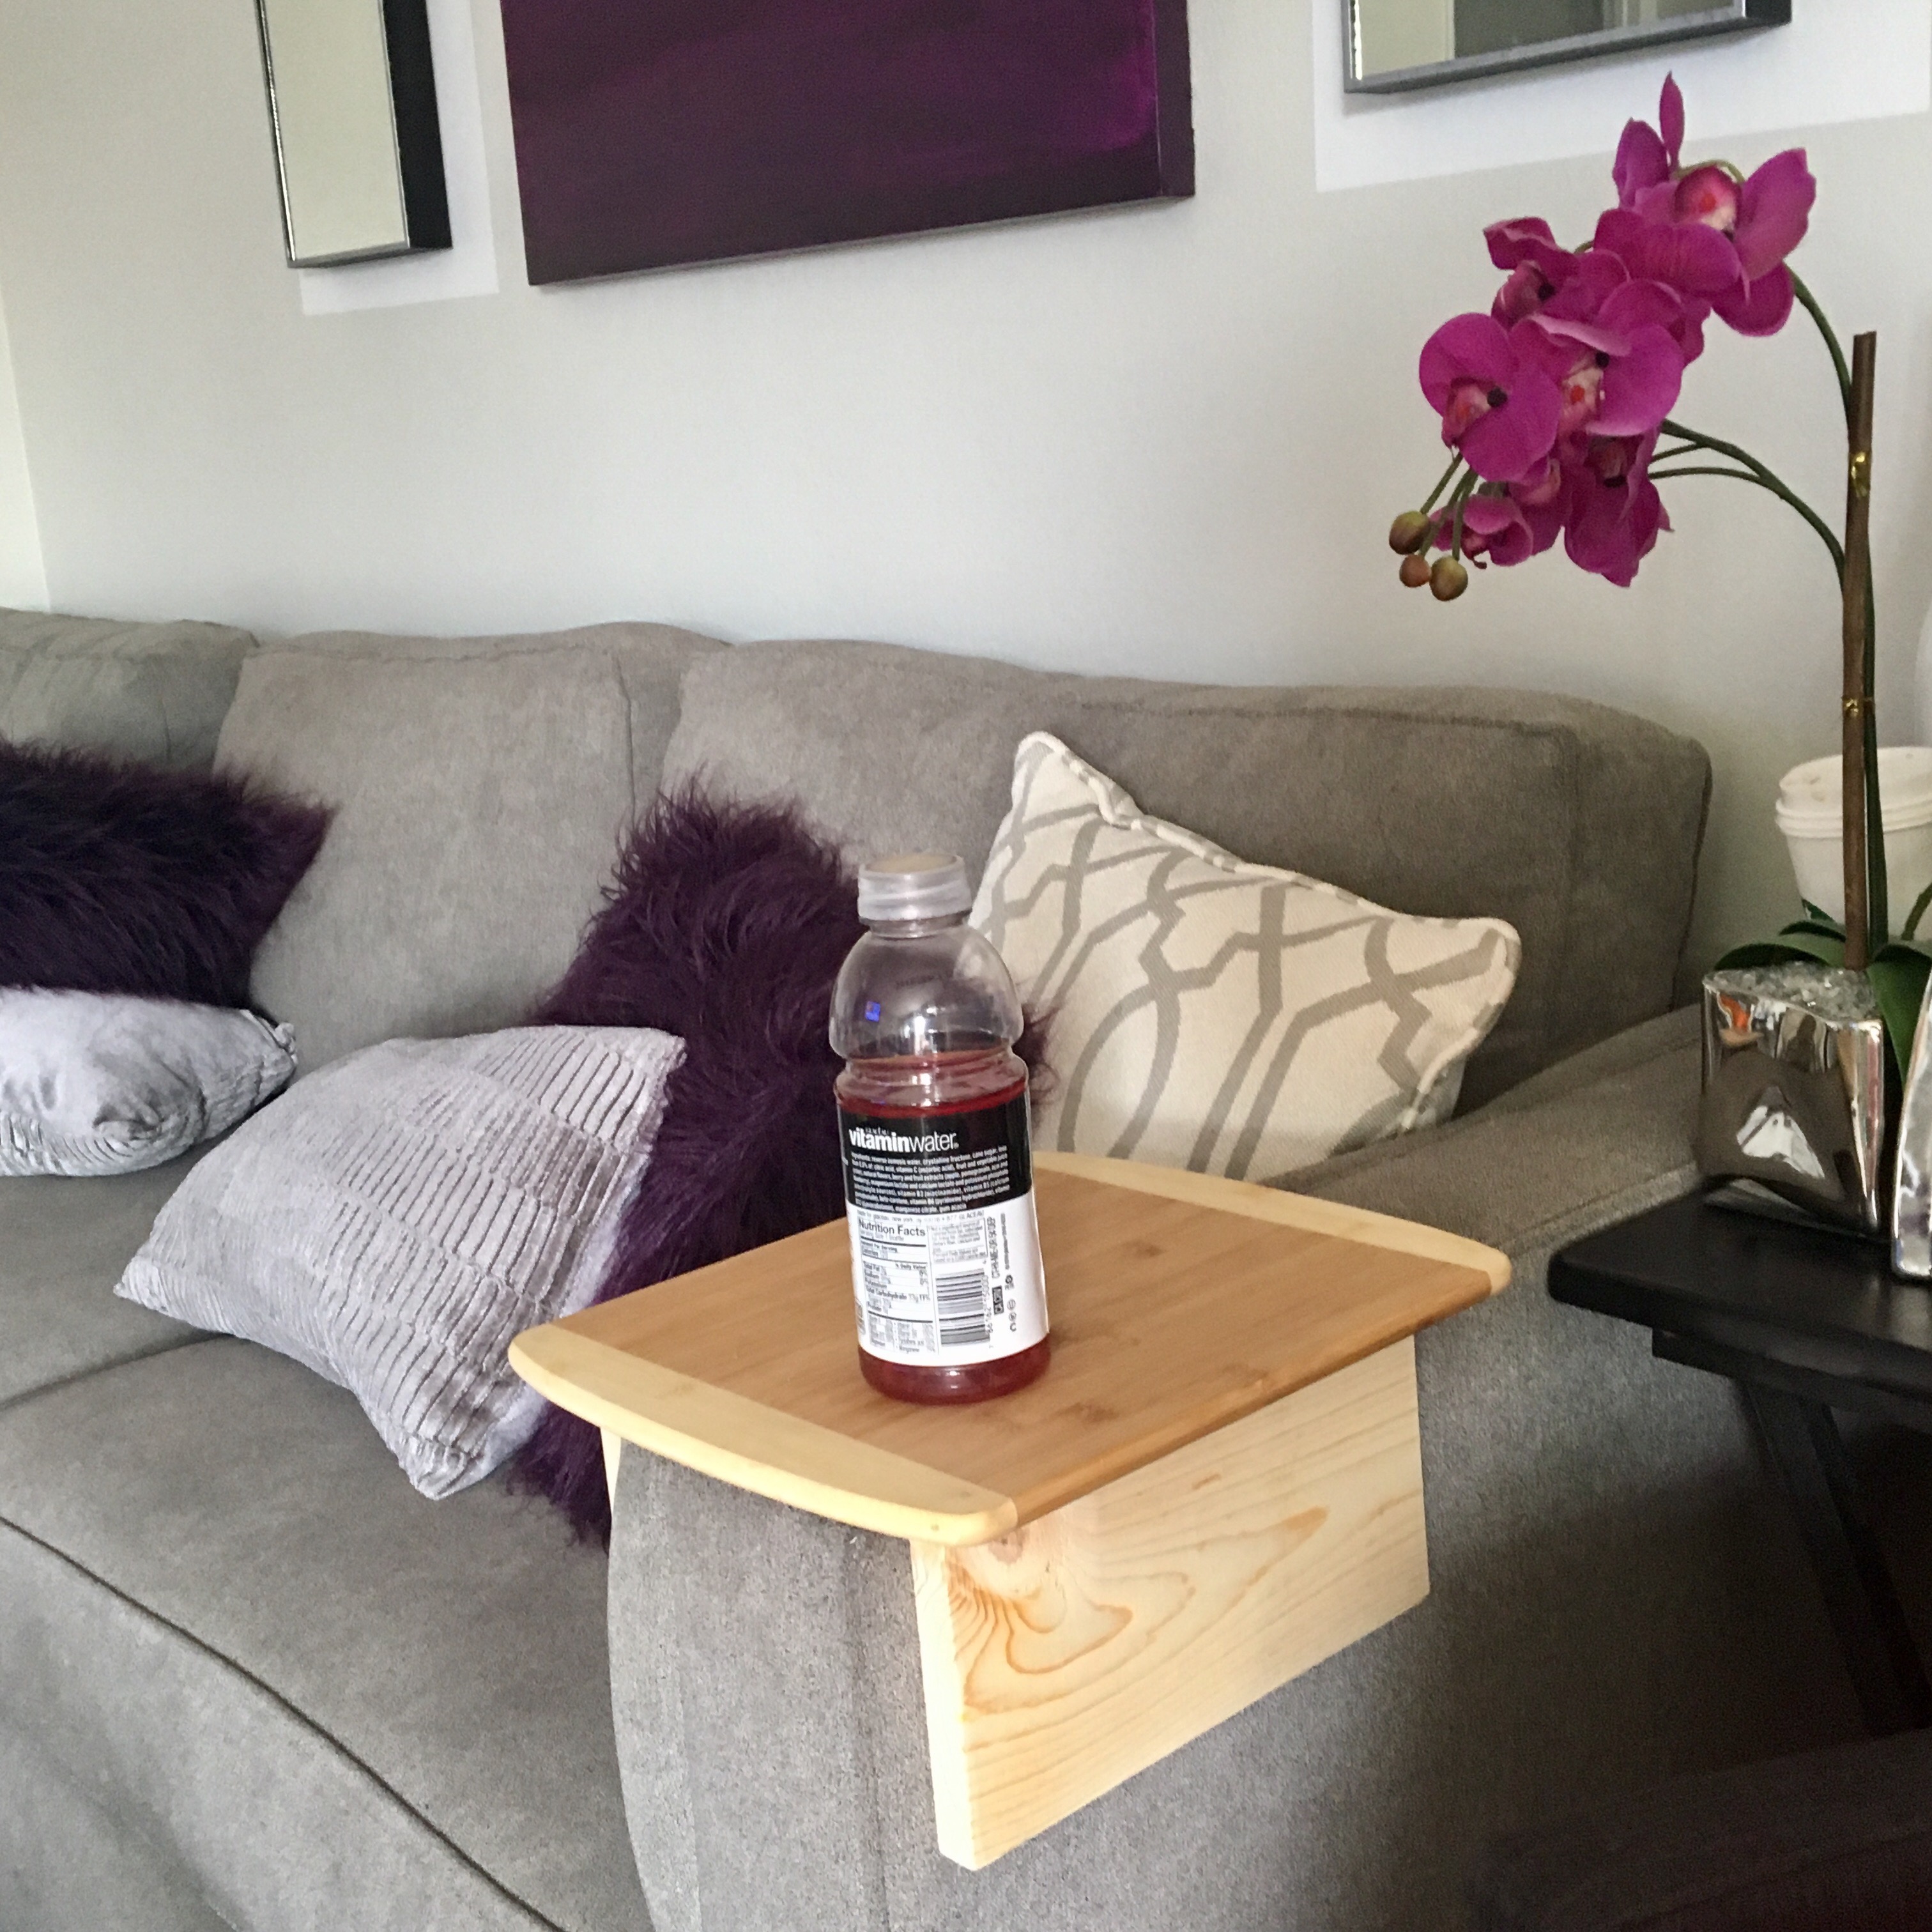
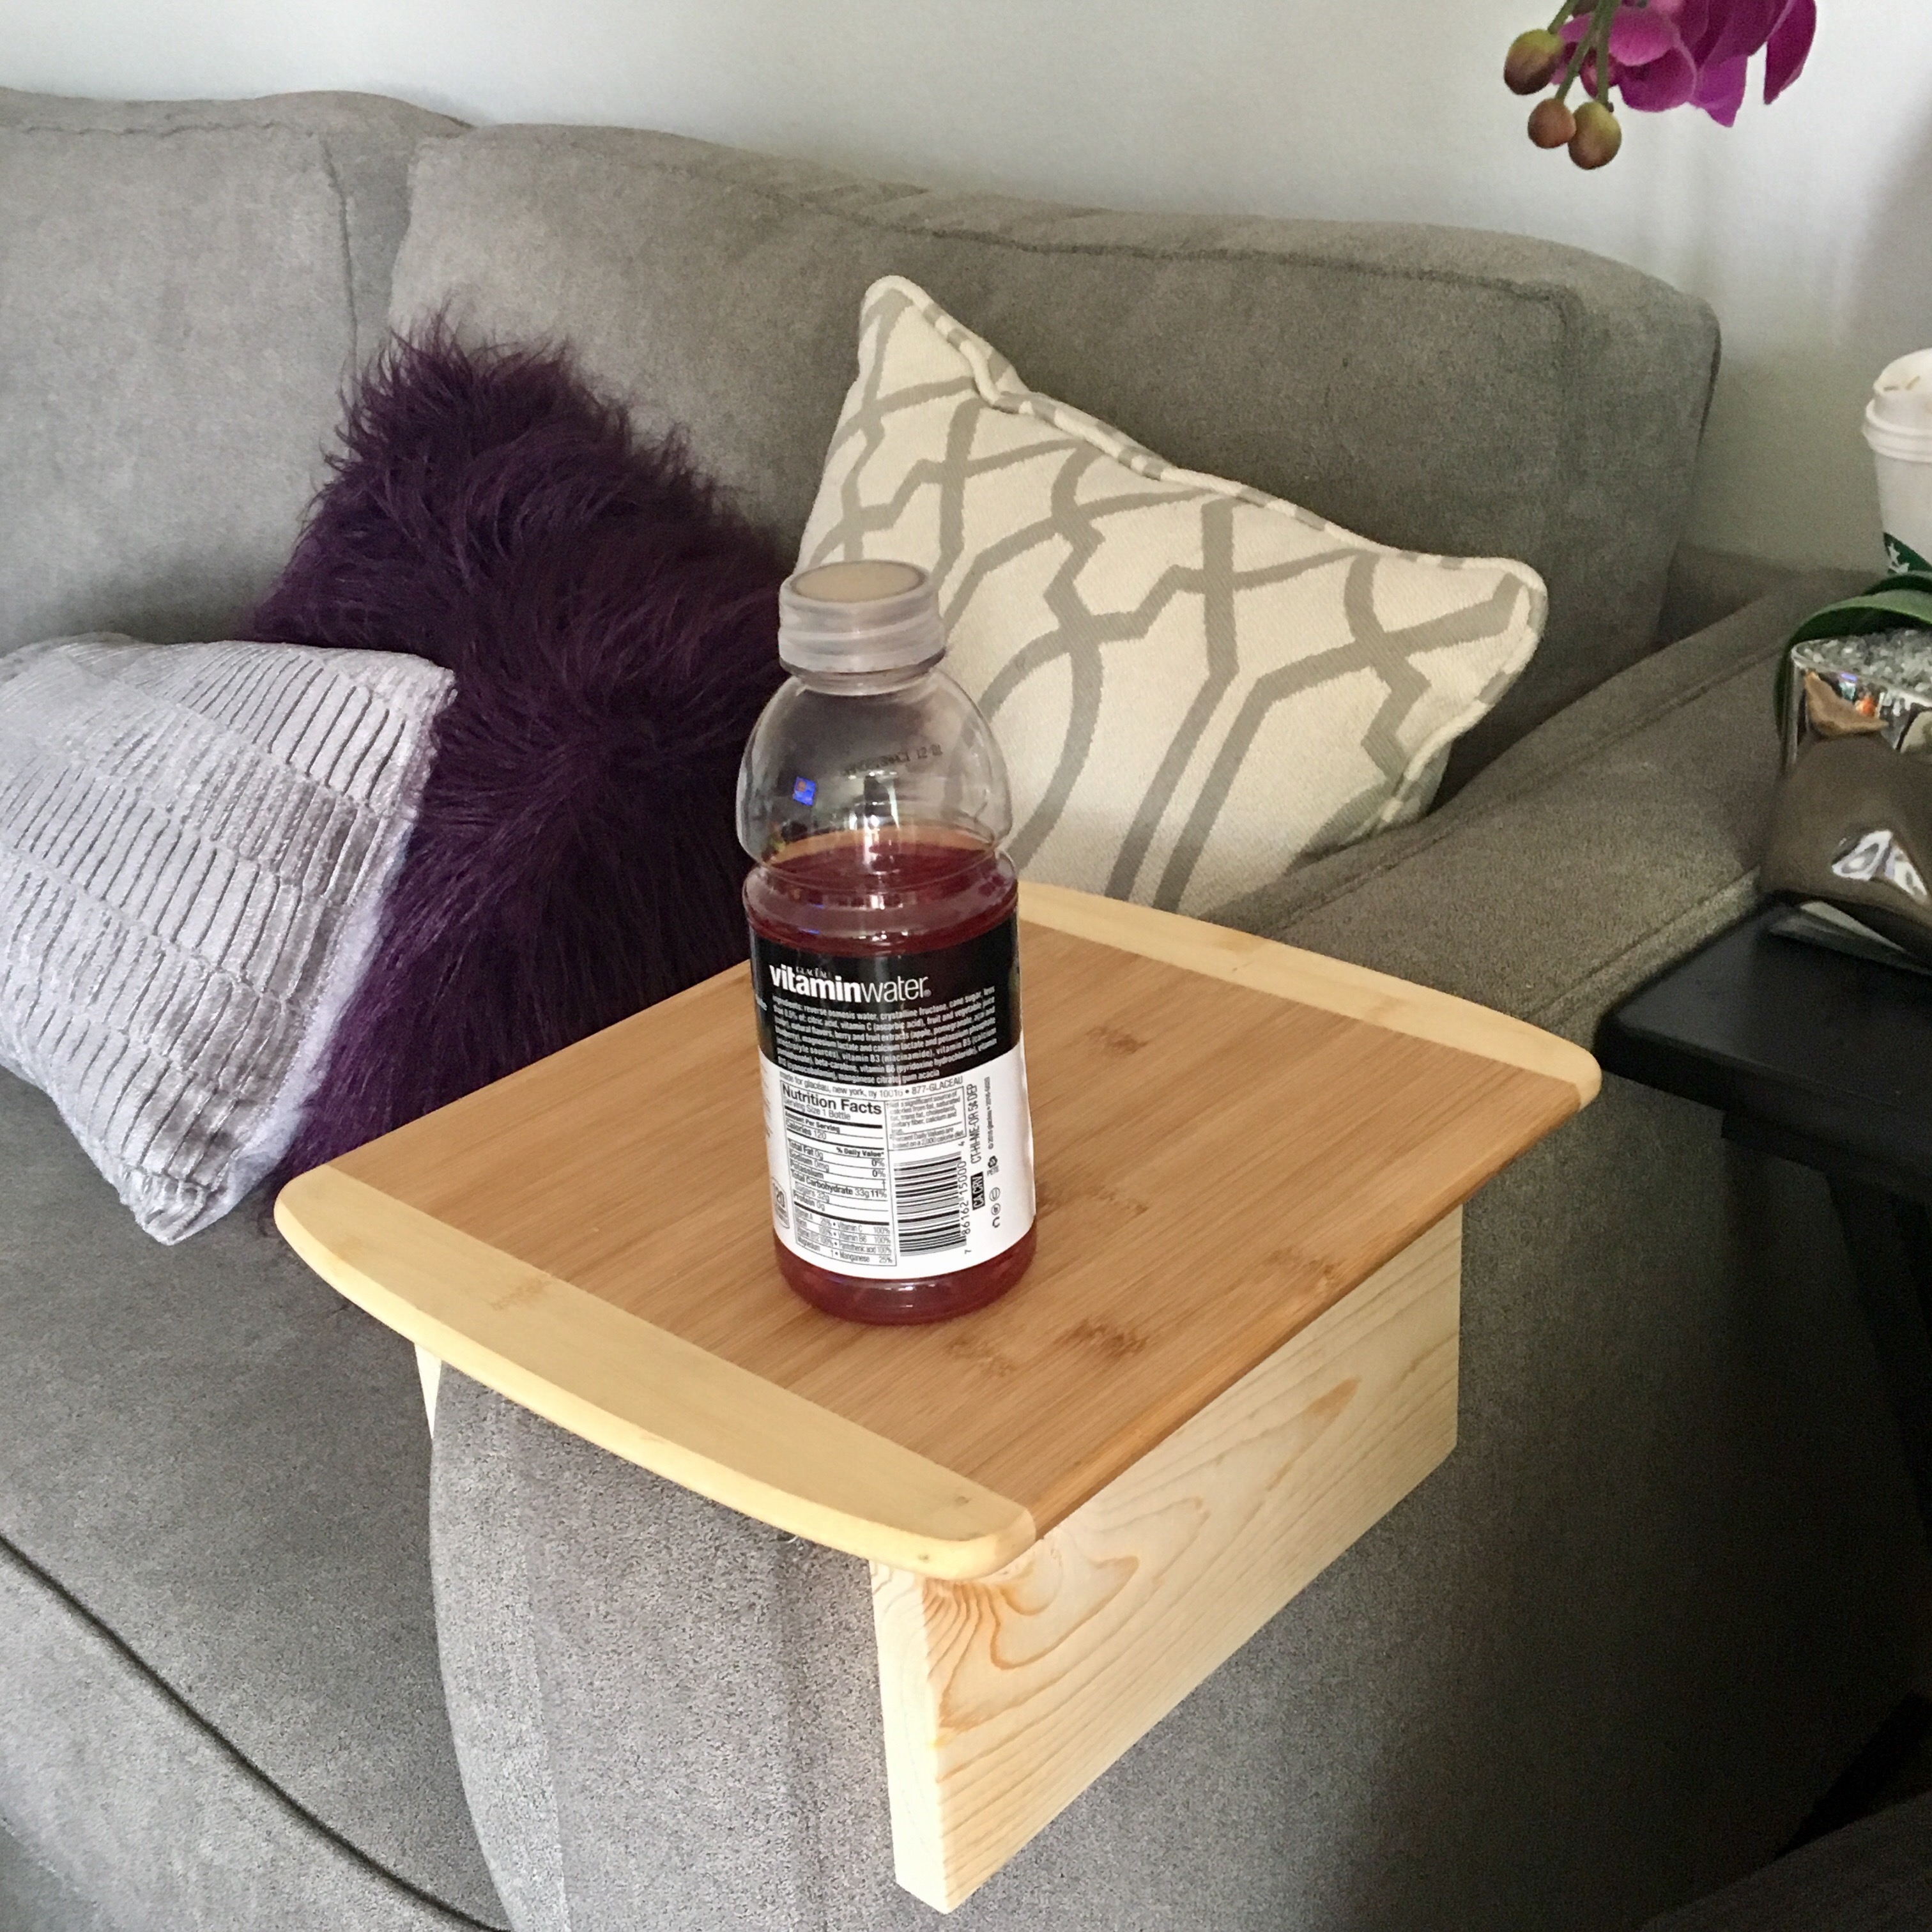
Turn a Cutting Board into this beautiful Sofa Arm Tray
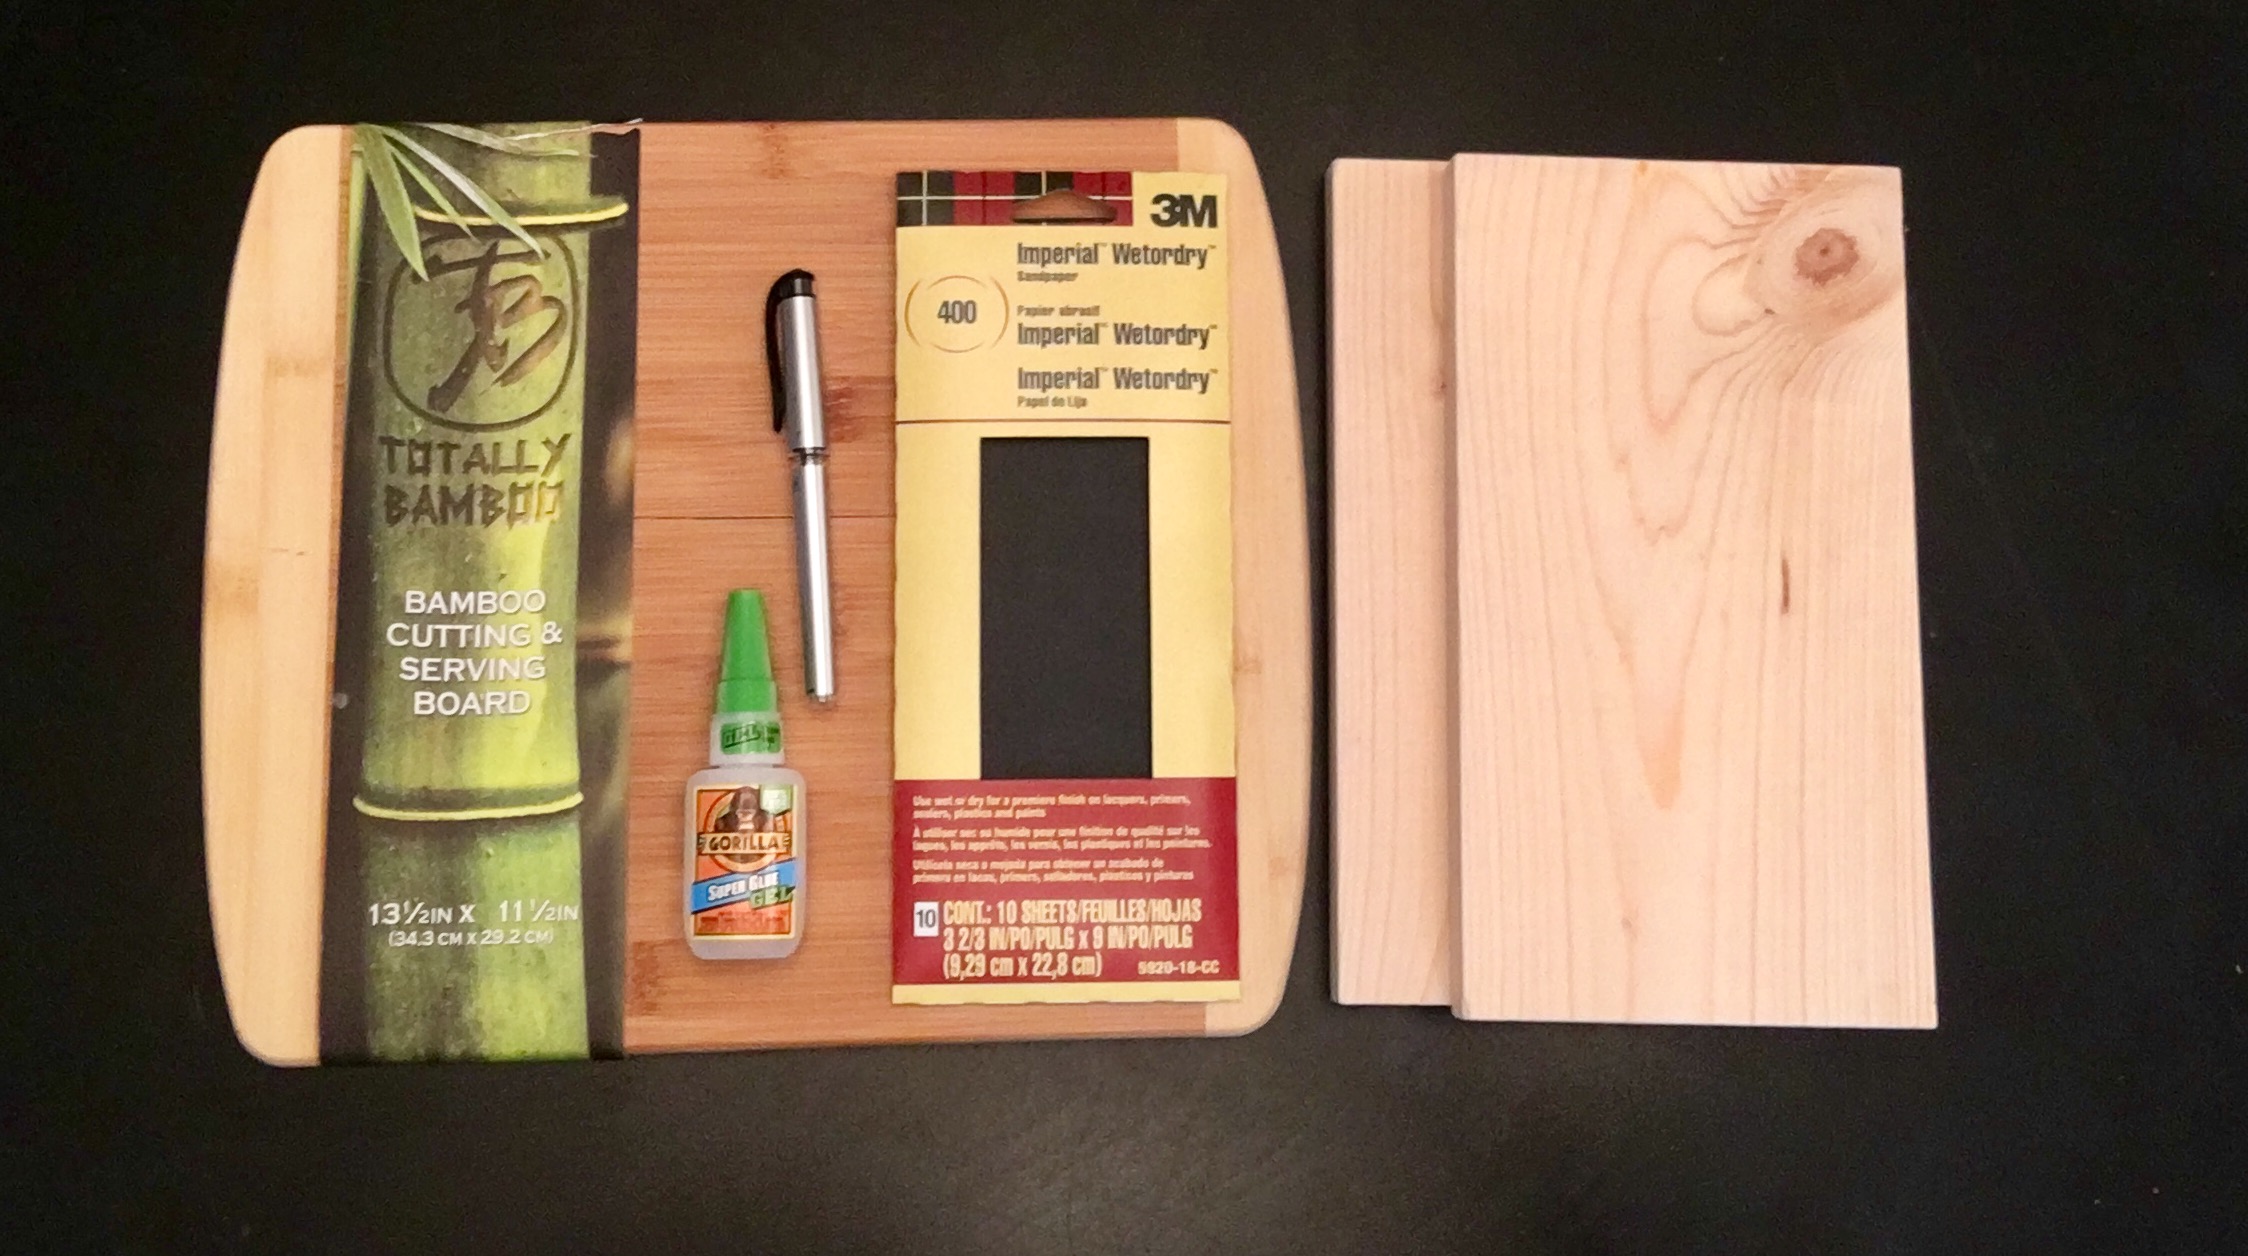
SUPPLIES
1- Cutting board purchased from Homegoods for $5
2 – Pieces of Pinewood from local hardware store
1- piece of sand paper
1- Pen to draw straight line on back of cutting board so I knew where to place the pinewood.
1- bottle of Gorilla glue

Step 1: Measure width of Sofa Arm Rest

Step 2: Get a FINISHED Cutting Board and Measure it
Get a cutting board in the shape/size you like that is already finished from a store like Homegoods or Marshalls (they have a large variety). You could also use an old cutting board you already have at home. Make sure it is about 3-4 inches wider than the width of your sofa arm! This will guarantee you have enough space on each side to apply legs. Measure the length of your cutting board and have wood cut to this dimension or slightly shorter. The width of my sofa arm was 8 inches. I got a cutting board 11.5 inches wide x 13.5 in long. I will reference these dimensions moving forward as reference.

Step 3: Go to local hardware store and purchase a piece of pinewood (1 x 6 x 12). Have them cut 2 pieces the length of your cutting board. I had them cut two 10 inch pieces to fit the length of my cutting board (wanted them slightly smaller than the full length of 13.5 in).

Step 4: Sand Plywood Legs & Back of Cutting Board
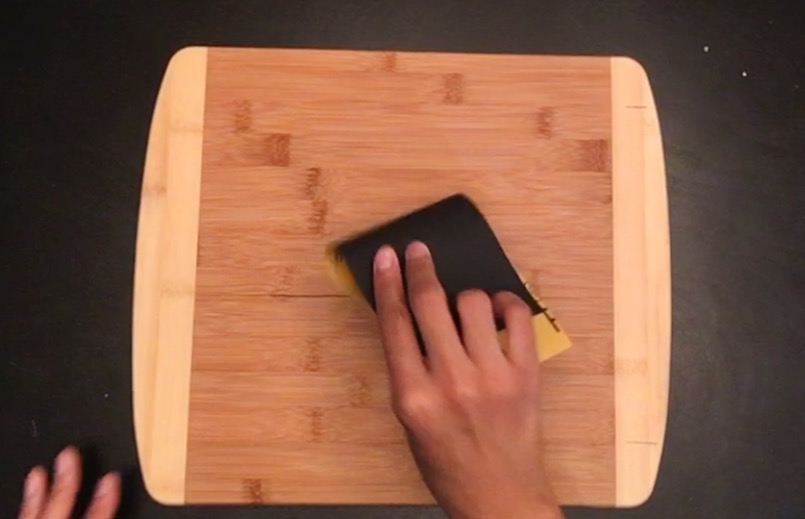
Use your 600 grit sand paper to smooth the edges of the two pinewood pieces you will use for the legs. You don’t want to get any splinters! You should also sand the back of the cutting board where you will be applying legs to make sure the legs have a clean surface to stick to.†Wipe all pieces clean with dry paper towel to remove wood dust.

Step 5: Mark Cutting Board 
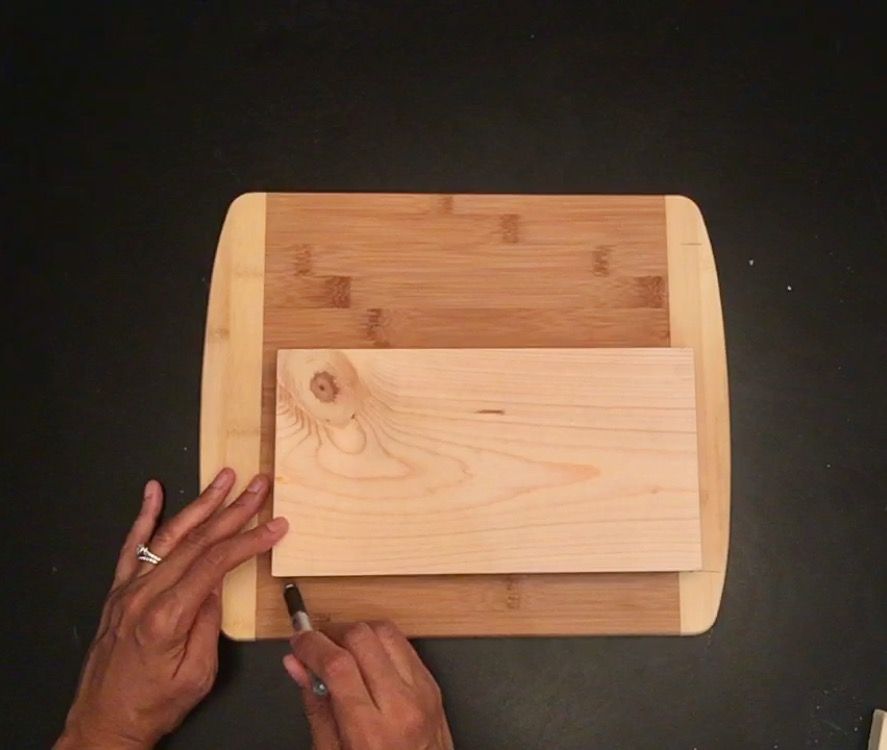
Place cutting board face down on a flat surface, mark the width of your sofa arm across the center of your cutting board. I marked 8 inches across leaving 1.75 inches of each side to apply my legs. This was perfect because the width of my legs were 1 inch leaving an extra .75 inches of space that would hang over on each side. At the end of each 8 inch mark I drew a line on each side of the cutting board to mark where I’d apply the legs.

Step 6: Apply Legs


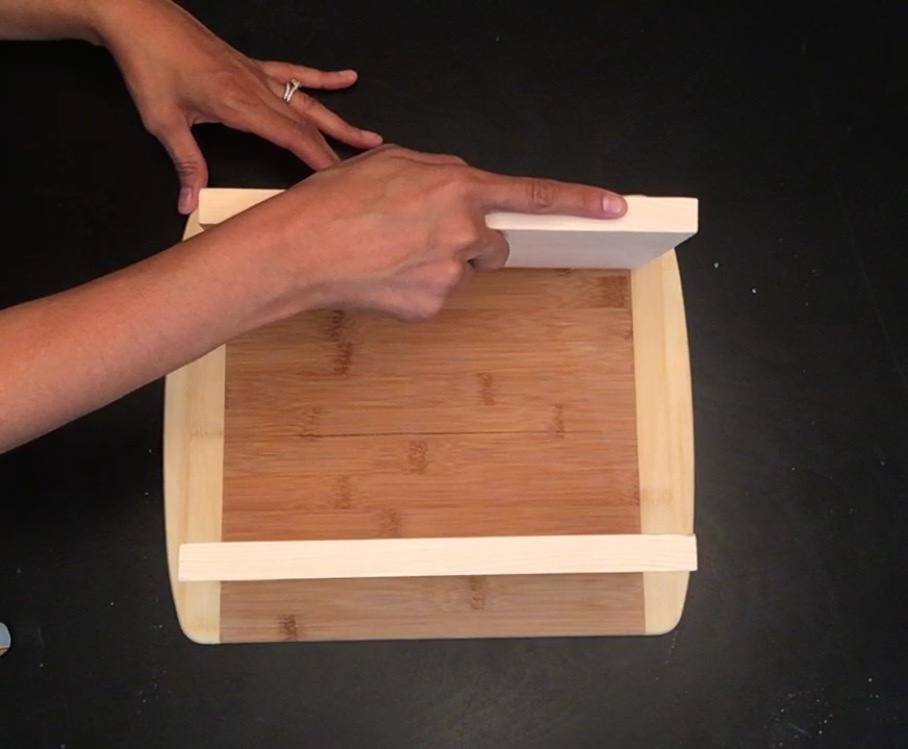
Apply generous amount of gorilla glue to right hand side of cutting board along the line that you drew (but not so much that it will spill over all the sides) and place the side piece directly on top. Make sure it’s aligned perfectly. I made sure to apply the legs on the side of the line closest to the OUTSIDE of my cutting board. This was to assure the 1in leg did not cross into the 8 inch width I had measured out. If I crossed into that space the arms would be too close together to fit onto the sofa arm. I repeated this step on both sides of the cutting board.
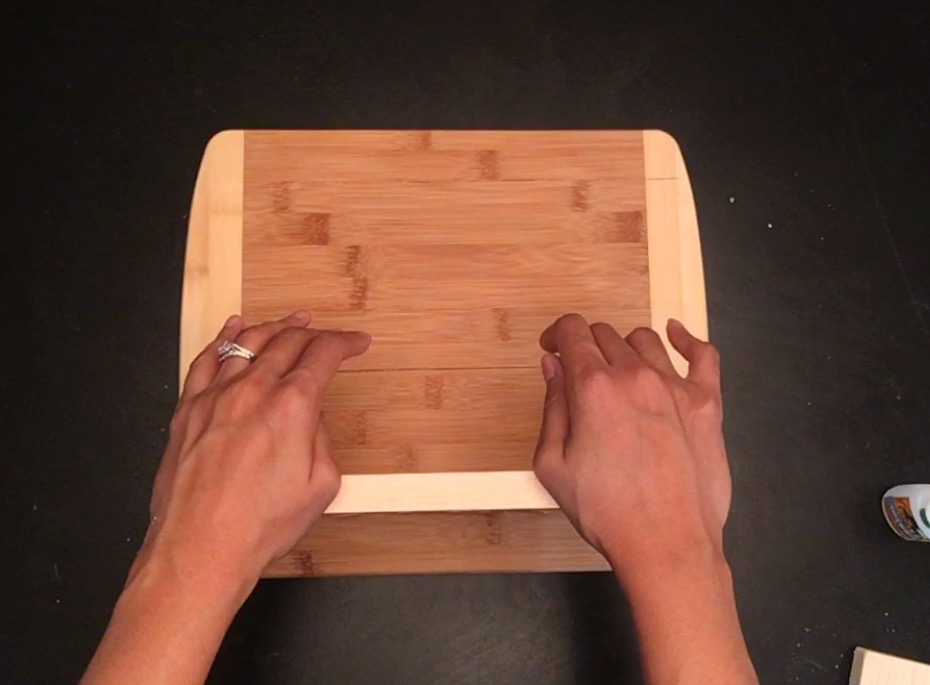
Step 7: Let Dry
The glue will dry within one minute, however, allow to dry in this position over night to be safe.

Step 8: Paint/decorate as you please.

I really liked how the existing wood design of the cutting board and the Pinewood I purchased matched so I just sanded the legs of the pinewood and left it as it was. 

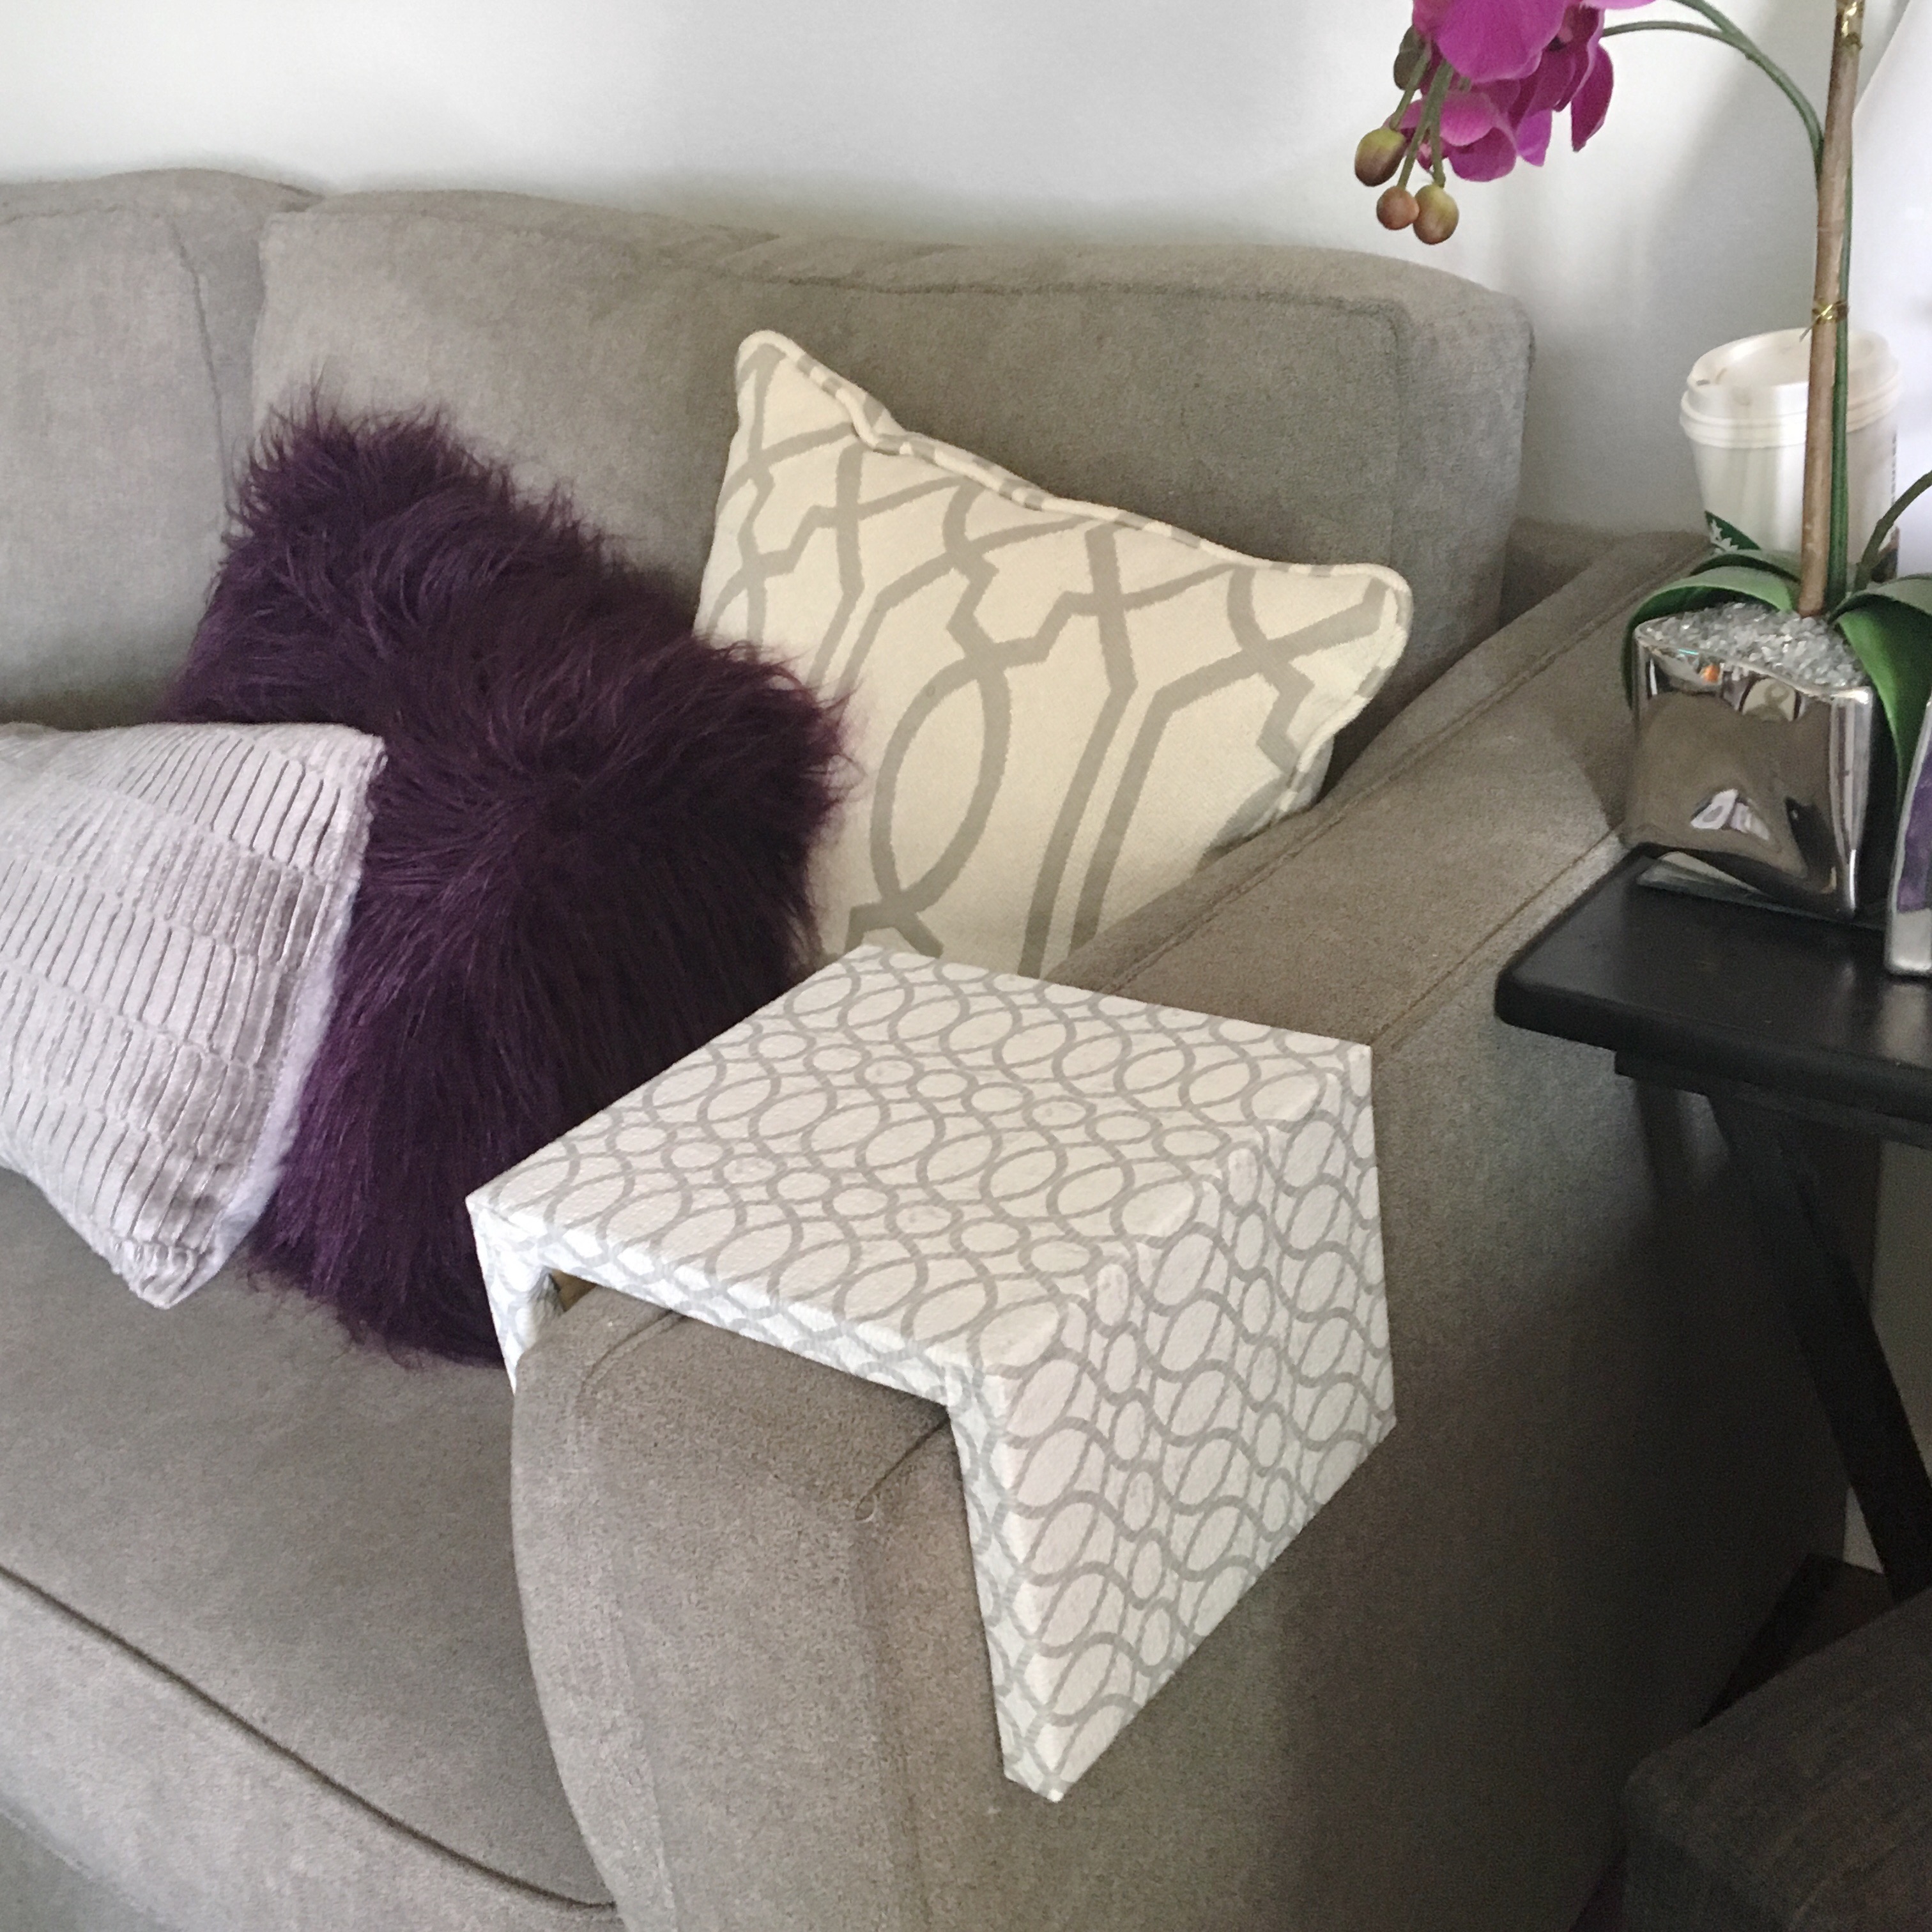
However, you can also stain it, cover with contact paper, stencil it, sky’s the limit! Take a look at the second Sofa Tray I made with all Pinewood to see how I decorated that below…

To Build:
Follow all the steps above, only replace the cutting board with a piece of pinewood to fit the dimensions of your sofa arm….

To Decorate: I used a soft grip non-adhesive contact paper. I cut it to the length and width of the crafted arm tray and applied the paper using a glue gun. Make sure you wrap the paper along the outside and inside of the tray, just gives it a better overall look.


Amazon and the Amazon logo are trademarks of Amazon.com, Inc, or its affiliates.

Related Posts

  • Decorating with Fringe! Endless possibilities…Decorating with Fringe! Endless possibilities…
  • Front Door Refresh Under $100Front Door Refresh Under $100
  • Introducing MYEYE4DIY Workshops!Introducing MYEYE4DIY Workshops!
  • Turn Your Favorite Quote into Wall Art Using Transfer PaperTurn Your Favorite Quote into Wall Art Using Transfer Paper
  • Create a DIY Photo Canvas WorkshopCreate a DIY Photo Canvas Workshop
  • DIY Christmas Decorating IdeasDIY Christmas Decorating Ideas

Share this:

  • Facebook
  • Pinterest
  • Twitter
  • Google
  • More
  • LinkedIn
  • Email

Filed Under: Decorating & Crafting Projects, Furniture Rehab, Home Decor, Project Tutorials, Videos | 3 Comments

« Decorating with Fringe! Endless possibilities…
Super Bowl Party Ideas »

Trackbacks

  1. COZY COUCH EDITION PART 2: DIY Pom Pom Throw Blanket - MyEye4DIY.com says:
    at 8:45 pm

    […] Blanket and cozy-up on your couch! If you missed my Cozy Couch Edition Part one you can find it here to see how to add the perfect Sofa Arm Tray to accompany your new blanket! […]

    Reply
  2. Amazing DIY Sofa Arm Table Tutorials - DIYCraftsGuru says:
    at 6:14 pm

    […] myeye4diy […]

    Reply
  3. DIY Upholstered Storage Ottoman - Modern Sleek Lines w/ Nailhead Trim says:
    at 7:45 pm

    […] The sleek lines along with the nailhead trim really bring out the modern decor of our living room! […]

    Reply

Leave a Reply Cancel reply

Search The Blog

Read More

Let’s Connect!

  • Email
  • Facebook
  • Instagram
  • Pinterest
  • YouTube

Subscribe to Posts Via Email

Watch MyEye4DIY TV


More From MyEye4DIY TV!


youtube

Sponsorship

info@myeye4diy.com

Instagram

The WOW factor your kids room may be missing! I ha The WOW factor your kids room may be missing! I have a cool hack that will instantly brighten your kids room or nursery and help them learn! ⠀⠀⠀⠀⠀⠀⠀⠀⠀
⠀⠀⠀⠀⠀⠀⠀⠀⠀
Head over to the blog to see how you can turn pool noodles into a huge rainbow for your home decor! When it’s done, you can hang it up in your children’s bedroom or play room for that WOW factor its been missing.⠀⠀⠀⠀⠀⠀⠀⠀⠀
⠀⠀⠀⠀⠀⠀⠀⠀⠀
It has actually been a great learning tool for our girls as well; helping them learn colors and even a little about weather. Over time, they've slowly started to identify the alphabet letters I added underneath. ⠀⠀⠀⠀⠀⠀⠀⠀⠀
⠀⠀⠀⠀⠀⠀⠀⠀⠀
Do you like decorating with color? Let me know what other Kid inspired DIY projects you'd like to see!⠀⠀⠀⠀⠀⠀⠀⠀⠀
⠀⠀⠀⠀⠀⠀⠀⠀⠀
Click link in bio for blog post. ⠀⠀⠀⠀⠀⠀⠀⠀⠀
#homedecor #Myeye4diy #DIYwallart #Rainbowwallart #weekenddiy #DIYprojects #wallart #Kidsroom #playroom #DIYRainbow #Rainbowhomedecor #poolnoodlehack #Ikeahack #Nursery #nurserydecor #kidsdecorations
Top 10 Indoor Kid Activities! It's not my usual DI Top 10 Indoor Kid Activities! It's not my usual DIY Home Decor project, but I was thinking about my fellow moms and want to share some of the indoor activities that have been keeping our family sane during this crazy time. You could literally start the fun immediately after reading this.
:
:
:
:
:
:
#Myeye4diy #homedecor #diy #diycrafts #momlife #stayathomemoms #stayathomemom #stayathomemomma  #todlerplayideas #toddlerplay #playathome #makewayforplay
#indooractivitiesforkids
#counting #sensoryplayideas #sensoryplay #sensorybin 
#finemotoractivity #trayoftheday #colors  #ourfunfactory #createmakeandplay #preschoolactivities #preschoolathome #earlyyearsactivities #earlychildhoodeducation #earlylearning #summerplay #summeractivitiesforkids #lockdownactivitiesforkids
Hey Everyone! It’s a beautiful day to grab suppl Hey Everyone! It’s a beautiful day to grab supplies for a ‘Weekend DIY’! Not an experienced painter, NOT A PROBLEM! I’m not either! But I love how my weekend project came out and want to share this short tutorial to help you step up your wall art. 
:
What colors are catching your eye these days?
:
Comment below with any questions and please tag me with your projects! 

Click link in bio for blog post. 
#homedecor #Myeye4diy #DIYwallart #ombrewallart #weekenddiy #DIYprojects #wallart #purplehomedecor #diy
Upgrade an ordinary old bookcase into a velvet tro Upgrade an ordinary old bookcase into a velvet tropical gem! Watch Live today at 4p PT on Facebook @hometalk.:
:
:
:
:
:
#homesecor #diyhomesecor #myeye4diy #bookcasemakeover #tropicalbookcase #contactpaper #velvetdiy #tropicalfurniture #tropical #diy #furnituremakeovers
Easy DIY No-Sew Pillows! Learn 2 techniques today Easy DIY No-Sew Pillows! Learn 2 techniques today 4p PT on HometalkTV. Change up your pillow game for the spring! Video tutorial will be on their Facebook page and website. Click link in their bio @hometalk. :
:
:
:
:
#nosewpillow #decorativepillows #nosew #sequinpillow #reversablesequins #pillow #diypillow #homedecor #diyhomedecor #myeye4diy #socialdistancing #diy #diyprojects #stayhome #videotutorial #purplepillow
Since we’re all home now, it’s a good time to Since we’re all home now, it’s a good time to get creative...let me show you how to make a kids kitchen set out of a few supplies you probably have around the house! See my full tutorial on eHow.com :
:
:
:
#diyKitchenplayset #diycardboardkitchen #kitchenplayset #myeye4diy #quarentine #toddlerlife #toddlerplay #toddlerplaytime #homeschool #kidplay #diy #howto #play #kitchendesign #diyprojects
Took this shoe storage up a notch...turned it into Took this shoe storage up a notch...turned it into an upholstered bench. Watch full tutorial on @hometalk TV today at 5p PT/8p ET. Follow my hometalk page for alerts on all my future videos! Thanks everyone! /
:
:
:
:
#myeye4diy #hometalk #homedecor #diy #diyvideos #diyexpert #diyblogger #shoestorage #diybench #diyhomedecor #upholsteredbench
‘I Love You’ Photo Frame tutorial today at 4p ‘I Love You’ Photo Frame tutorial today at 4p PT/7P ET. See how these wood letters transformed into this super cute Valentines Day Gift idea. :
:
:
#diyhomedecor #blogger #diyblogger #homedecor #valentines #valentinesgiftideas #valentinesgift #photoframes #woodletters #diy #myeye4diy #valentinesframe #cupid #interiordiy #interiordesign #interiordiyer
Turn Dollar Store supplies into a gorgeous DIY Riv Turn Dollar Store supplies into a gorgeous DIY River-Rock Welcome Doormat! See my full tutorial at eHow.com :
:
:
#diyhomedecor #diydoormat #diy #ehow #diyblogger #blogger #interiordesign #diyinterior #interiordiy #frontdoor #refresh #stones #diytutorial #homedecor
Follow on Instagram

Pinterest

Visit My Eye 4 DIY's profile on Pinterest.

Categories

Subscribe to Posts Via Email

  • Email
  • Facebook
  • Instagram
  • Pinterest
  • YouTube

Copyright © 2023 My Eye 4 DIY · Design by Melanie Anne Creative · Powered By Wordpress

loading Cancel
Post was not sent - check your email addresses!
Email check failed, please try again
Sorry, your blog cannot share posts by email.