MyEye4DIY.com

"My Eye for DIY" - No Rules, Just Guidelines!

  • Blog
  • DIY Project Tutorials
    • Home Decor
    • Room Makeover
    • Furniture Rehab
    • Kids Home Decor
    • Event Decorating Ideas
    • DIY Workshops
    • DIY Projects With eHow
  • Lifestyle
    • Beauty
    • Fashion
  • MyEye4DIY TV
  • About
  • Contact

Jul 2

Tricycle Diaper Cake Tutorial

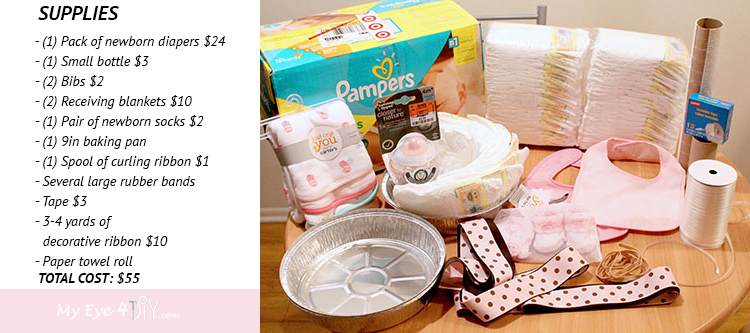
As an Amazon Associate I earn from qualifying purchases.

I received an email from two of my good friends with a message and a link to a D-I-Y baby tricycle diaper cake tutorial; “Hey Girl!! Take a look at the link and let us know if this is something you can do!”. Umm, can you say bait and hook? What D.I.Y. gal do you know who will pass on a CHALLENGE like that? Well played girls! I was excited to make a tricycle diaper cake, especially since it was for another good friend of ours!  


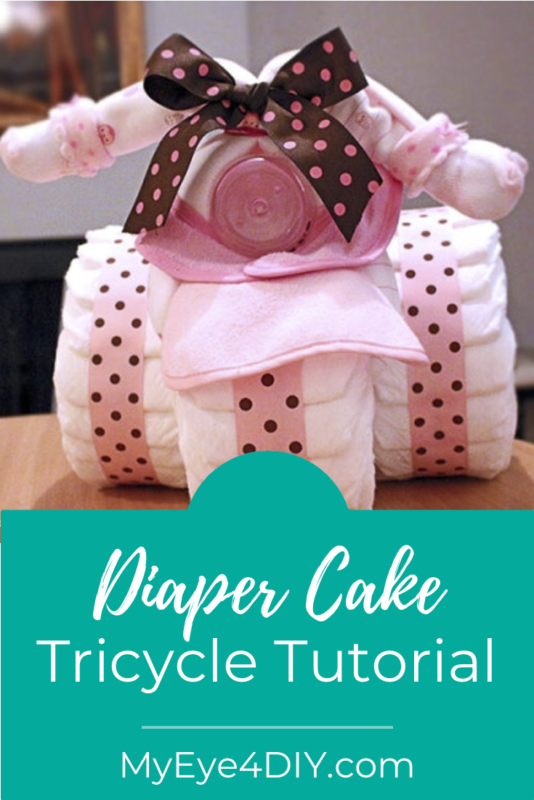
One of my friends from the email had specific modifications that had to be made to the original design. I assured her that I could pull it off to make the best Tricycle Diaper Cake centerpiece our expecting mom had ever seen…however,  I didn’t know this even existed before that day. HA! Let me know what you think.


The best part about this project is that the center piece doubles as a gift for the the mommy-to-be. Once the baby is born she can disassemble the tricycle and use all the supplies! Winning!!!


       tricycle diaper cake supply list


How To Make A Tricycle Diaper Cake

When you’re putting together a tricycle diaper cake, remember, there are NO RULES! JUST GUIDELINES!  I searched a few tutorials and made it my own. Here’s what I learned in the process…


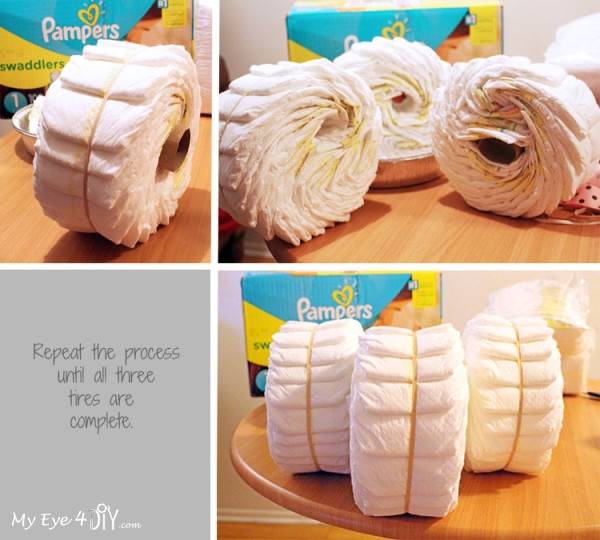
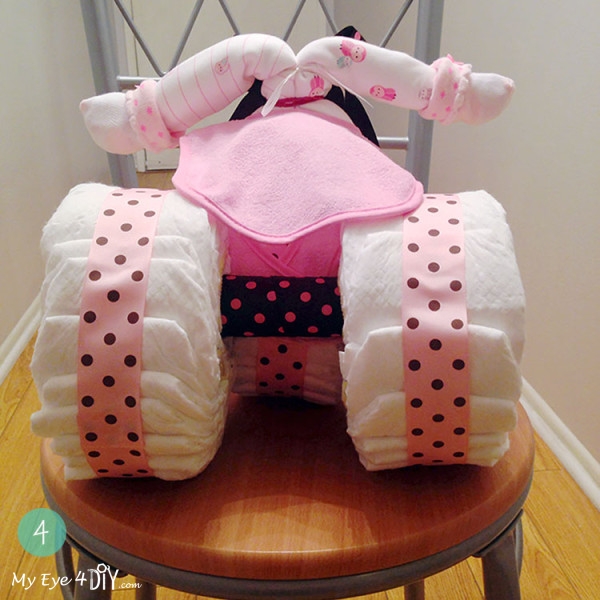
STEP 1:Tricycle Diaper Cake – Making the Wheels

The wheels are the main backbone to this piece so you want to make sure all three are sturdy with this four step process.
1) Place paper towel roll or toilet paper roll in center of your baking pan (the roll will help keep a perfect circle in the center of the wheel which is needed once you begin assembly).
2) One at a time, add about 20 diapers to the pan, each one overlapping about an inch. 
Make an ‘S’ shape, tucking the beginning diapers into the middle wrapping around the toilet paper roll so the latter diapers remain on the outside. (The baking pan will help shape the wheel into a perfect circle.) Making the Wheels on the tricycle diaper cake
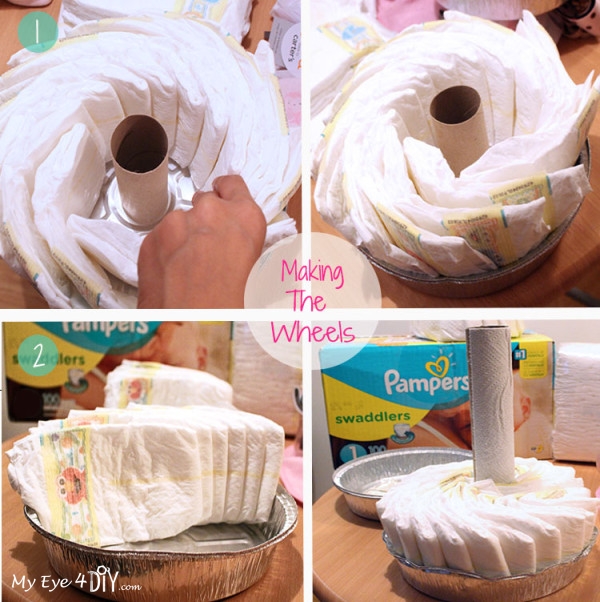
3) Once complete, take large rubber band and wrap it around all the diapers in the pan. Adjust the diapers, if necessary, so they appear perfectly flat.
4) Gently flip pan upside down to release the diaper wheel, pulling on the inside of toilet paper roll if needed to get the entire wheel out. Making the wheels on the tricycle diaper cake
3 tires

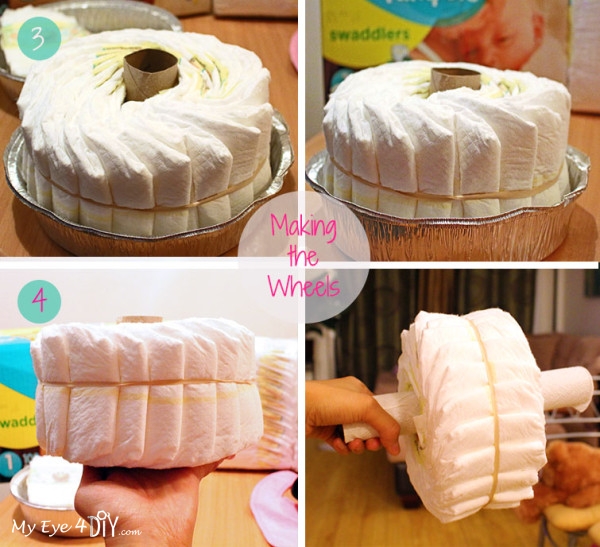
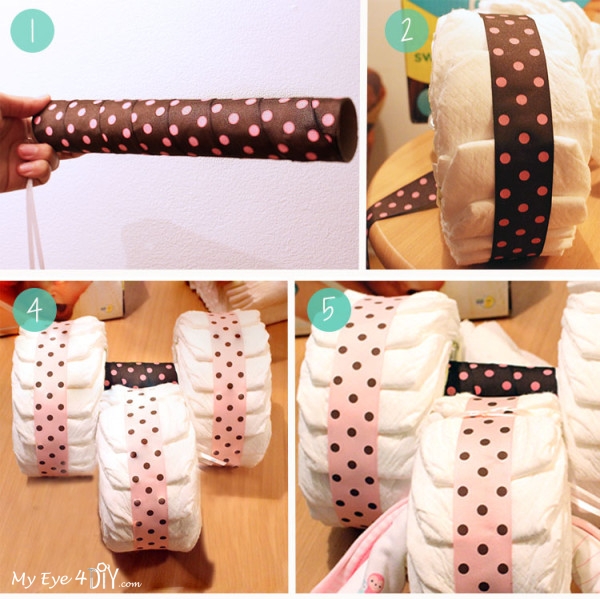
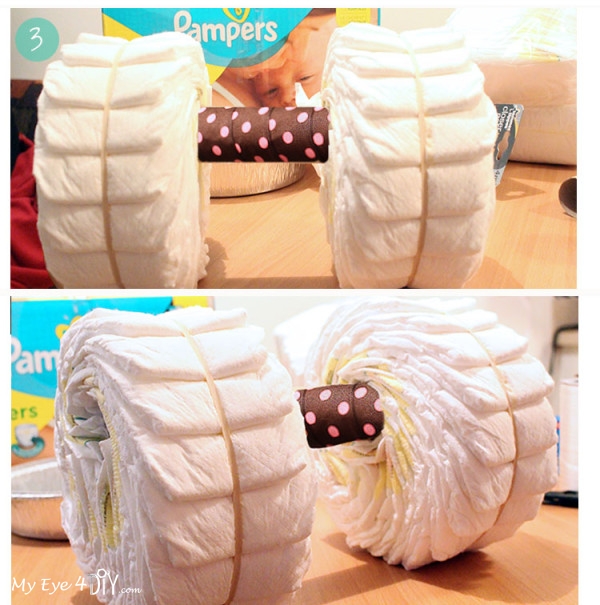
STEP 2: Tricycle Diaper Cake Tire Assembly


1) Cover paper towel roll with ribbon. It will be used to connect & stabilize the two back wheels.
2) Measure and then cover the rubber band on each tire with thick polka-dot ribbon. To make sure it’s secure you can place a few pieces of double sided tape along the rubber band. I also used my glue gun to seal both ends of the ribbon to one another.
3) Take two of the wheels and insert the covered paper towel roll into each end.
4) Place the third wheel in between the two you have just connected.
5) Cut a piece of the thin white curling ribbon and insert it between the two back tires, essentially going through the paper towel roll. Take each end and pull it through the front tire, crossing one over the other. Pull each end tight and pull them above the top of the tire and tie it into a bow.

 Assembling the tricycle diaper cake assembly2

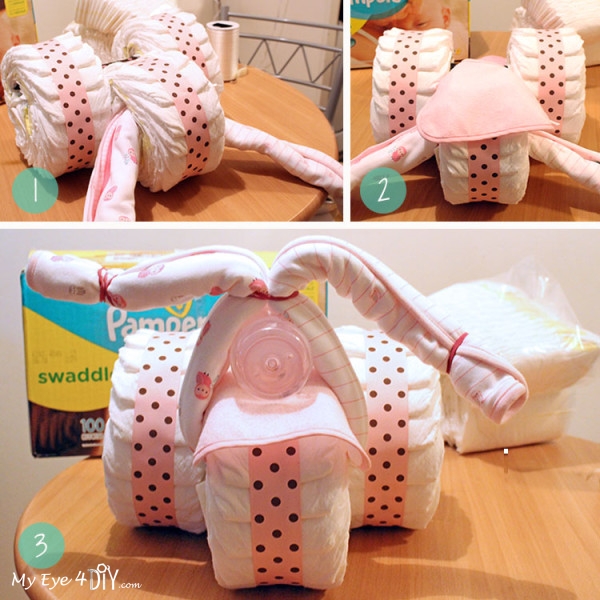
Step 3: Tricycle Diaper Cake Handlebar Assembly


1) Roll up receiving blanket and insert through front wheel. (Receiving blanket will act as handlebar)
2) Place one bib over the front tire with velcro portion facing the back. (Bib will act as puddle guard)
3) Place the bottle on top of the bib, with the nipple facing the back wheels (bottle will act as headlight). Pull both ends of the receiving blanket up over the bottle and secure with a rubber band. I also put rubber bands on both ends of the receiving blanket to keep the handle bars from unraveling as I worked.
4) Add the second bib over the bottle and use the neck to secure around the headlight, this will act as seat cover.
5) Lastly, take the baby socks and place over the ends of the receiving blanket to act as handle bars and use the excess polka-dot ribbon and tie a bow in the center which will also cover the rubber band above the bottle.

 Handlebar assembly on the tricycle diaper cake tricycle diaper cake
Last step of the tricycle diaper cake
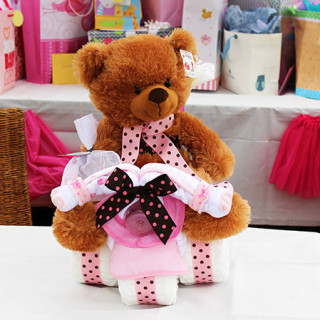
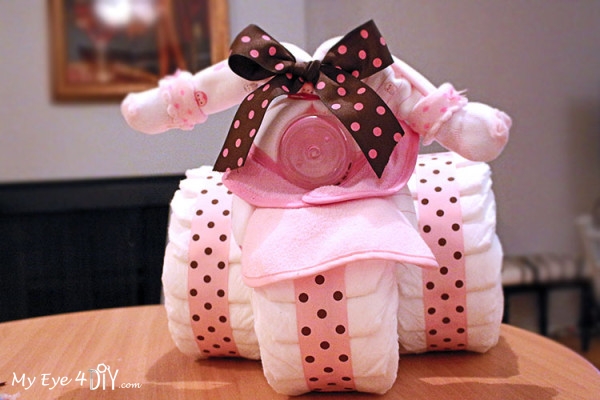
Voilà! It’s complete!

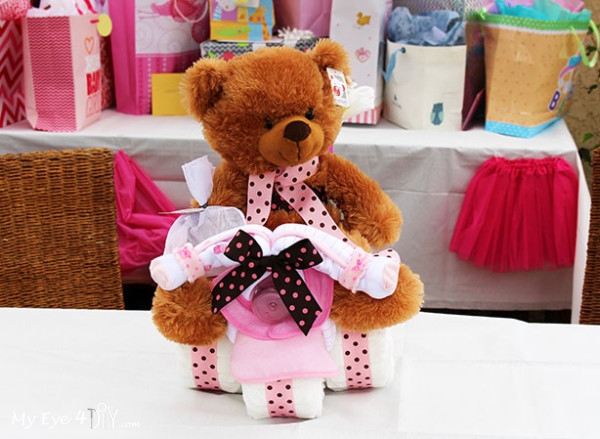
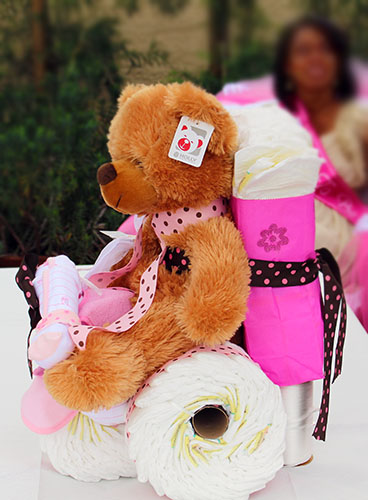
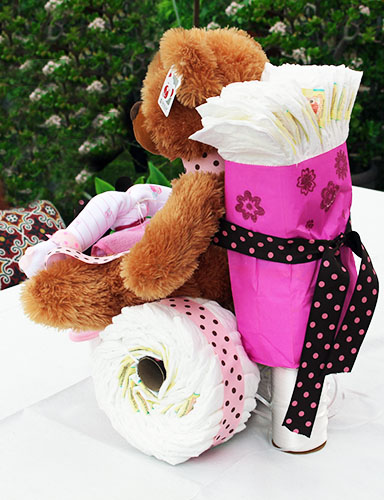
Since this was going to be the centerpiece at the baby shower, one of my friend’s modifications was to place a teddy bear on top.  I added a little ribbon around his and he looked super cute! Then I realized I had extra diapers, so I added a little backpack filled with the extras so it looks like he rode into the shower bearing gifts…no pun intended! HA! NOTE: I used a pink paper lunch bag I had in my box of tricks to make the backpack and added some stickers to it.
tricycle diaper cake
tricycle diaper cake With a Teddy Bear tricycle diaper cake with teddy bear
Final tricycle diaper cakeHope you enjoyed this tutorial – and don’t miss out on some of our favorite crafts here at My Eye 4 DIY – Drab To Fab Headboard Makeover and Painting an Accent Wall.

Amazon and the Amazon logo are trademarks of Amazon.com, Inc, or its affiliates.

Related Posts

  • How To Make a Pom Pom and a Pom Pom Throw BlanketHow To Make a Pom Pom and a Pom Pom Throw Blanket
  • MyEye4DIY Photo Canvas WorkshopMyEye4DIY Photo Canvas Workshop
  • At Home Hand Moisturizing TreatmentAt Home Hand Moisturizing Treatment
  • DIY Bedazzled Bling CrocsDIY Bedazzled Bling Crocs
  • DIY Doormat with River RocksDIY Doormat with River Rocks
  • Make a DIY Upholstered Storage Ottoman [Watch]Make a DIY Upholstered Storage Ottoman [Watch]

Share this:

  • Facebook
  • Pinterest
  • Twitter
  • Google
  • More
  • LinkedIn
  • Email

Filed Under: Decorating & Crafting Projects | 6 Comments

« Turn Your Favorite Quote into Wall Art Using Transfer Paper
Creating Ombre Wall Art »

Comments

  1. Shelly says

    at 6:12 pm

    The trike came out cute, but I have a leftover blanket….

    Reply
    • kalia200 says

      at 8:34 pm

      So happy to hear, just add the blanket in as part of your gift! ;o)

      Reply
  2. Kim says

    at 2:54 pm

    Thank you your instructions are the best I’ve found!

    Reply
    • kalia200 says

      at 8:33 pm

      Thank you so much Kim. I’m so happy it was clear and useful!

      Reply
  3. Nicole says

    at 9:06 pm

    Absolutely lovely. And by far the easiest and diy friendly I’ve found. Thanks much for taking the time to post. Of course I’ll have some variations, but I can’t wait to see turn out.

    Thanks again ! !

    Reply

Trackbacks

  1. 9 Adorable DIY Tricycle Diaper Cake Ideas ⋆ Bright Stuffs says:
    at 2:40 pm

    […] What we love about this magnificent mom-to-be gift is that it looks like a beautiful centerpiece at the very first glance, but once the baby is born, you can dismantle it to use up individual supplies. Make it with this easy DIY here. […]

    Reply

Leave a Reply Cancel reply

Search The Blog

Read More

Let’s Connect!

  • Email
  • Facebook
  • Instagram
  • Pinterest
  • YouTube

Subscribe to Posts Via Email

Watch MyEye4DIY TV


More From MyEye4DIY TV!


youtube

Sponsorship

info@myeye4diy.com

Instagram

The WOW factor your kids room may be missing! I ha The WOW factor your kids room may be missing! I have a cool hack that will instantly brighten your kids room or nursery and help them learn! ⠀⠀⠀⠀⠀⠀⠀⠀⠀
⠀⠀⠀⠀⠀⠀⠀⠀⠀
Head over to the blog to see how you can turn pool noodles into a huge rainbow for your home decor! When it’s done, you can hang it up in your children’s bedroom or play room for that WOW factor its been missing.⠀⠀⠀⠀⠀⠀⠀⠀⠀
⠀⠀⠀⠀⠀⠀⠀⠀⠀
It has actually been a great learning tool for our girls as well; helping them learn colors and even a little about weather. Over time, they've slowly started to identify the alphabet letters I added underneath. ⠀⠀⠀⠀⠀⠀⠀⠀⠀
⠀⠀⠀⠀⠀⠀⠀⠀⠀
Do you like decorating with color? Let me know what other Kid inspired DIY projects you'd like to see!⠀⠀⠀⠀⠀⠀⠀⠀⠀
⠀⠀⠀⠀⠀⠀⠀⠀⠀
Click link in bio for blog post. ⠀⠀⠀⠀⠀⠀⠀⠀⠀
#homedecor #Myeye4diy #DIYwallart #Rainbowwallart #weekenddiy #DIYprojects #wallart #Kidsroom #playroom #DIYRainbow #Rainbowhomedecor #poolnoodlehack #Ikeahack #Nursery #nurserydecor #kidsdecorations
Top 10 Indoor Kid Activities! It's not my usual DI Top 10 Indoor Kid Activities! It's not my usual DIY Home Decor project, but I was thinking about my fellow moms and want to share some of the indoor activities that have been keeping our family sane during this crazy time. You could literally start the fun immediately after reading this.
:
:
:
:
:
:
#Myeye4diy #homedecor #diy #diycrafts #momlife #stayathomemoms #stayathomemom #stayathomemomma  #todlerplayideas #toddlerplay #playathome #makewayforplay
#indooractivitiesforkids
#counting #sensoryplayideas #sensoryplay #sensorybin 
#finemotoractivity #trayoftheday #colors  #ourfunfactory #createmakeandplay #preschoolactivities #preschoolathome #earlyyearsactivities #earlychildhoodeducation #earlylearning #summerplay #summeractivitiesforkids #lockdownactivitiesforkids
Hey Everyone! It’s a beautiful day to grab suppl Hey Everyone! It’s a beautiful day to grab supplies for a ‘Weekend DIY’! Not an experienced painter, NOT A PROBLEM! I’m not either! But I love how my weekend project came out and want to share this short tutorial to help you step up your wall art. 
:
What colors are catching your eye these days?
:
Comment below with any questions and please tag me with your projects! 

Click link in bio for blog post. 
#homedecor #Myeye4diy #DIYwallart #ombrewallart #weekenddiy #DIYprojects #wallart #purplehomedecor #diy
Upgrade an ordinary old bookcase into a velvet tro Upgrade an ordinary old bookcase into a velvet tropical gem! Watch Live today at 4p PT on Facebook @hometalk.:
:
:
:
:
:
#homesecor #diyhomesecor #myeye4diy #bookcasemakeover #tropicalbookcase #contactpaper #velvetdiy #tropicalfurniture #tropical #diy #furnituremakeovers
Easy DIY No-Sew Pillows! Learn 2 techniques today Easy DIY No-Sew Pillows! Learn 2 techniques today 4p PT on HometalkTV. Change up your pillow game for the spring! Video tutorial will be on their Facebook page and website. Click link in their bio @hometalk. :
:
:
:
:
#nosewpillow #decorativepillows #nosew #sequinpillow #reversablesequins #pillow #diypillow #homedecor #diyhomedecor #myeye4diy #socialdistancing #diy #diyprojects #stayhome #videotutorial #purplepillow
Since we’re all home now, it’s a good time to Since we’re all home now, it’s a good time to get creative...let me show you how to make a kids kitchen set out of a few supplies you probably have around the house! See my full tutorial on eHow.com :
:
:
:
#diyKitchenplayset #diycardboardkitchen #kitchenplayset #myeye4diy #quarentine #toddlerlife #toddlerplay #toddlerplaytime #homeschool #kidplay #diy #howto #play #kitchendesign #diyprojects
Took this shoe storage up a notch...turned it into Took this shoe storage up a notch...turned it into an upholstered bench. Watch full tutorial on @hometalk TV today at 5p PT/8p ET. Follow my hometalk page for alerts on all my future videos! Thanks everyone! /
:
:
:
:
#myeye4diy #hometalk #homedecor #diy #diyvideos #diyexpert #diyblogger #shoestorage #diybench #diyhomedecor #upholsteredbench
‘I Love You’ Photo Frame tutorial today at 4p ‘I Love You’ Photo Frame tutorial today at 4p PT/7P ET. See how these wood letters transformed into this super cute Valentines Day Gift idea. :
:
:
#diyhomedecor #blogger #diyblogger #homedecor #valentines #valentinesgiftideas #valentinesgift #photoframes #woodletters #diy #myeye4diy #valentinesframe #cupid #interiordiy #interiordesign #interiordiyer
Turn Dollar Store supplies into a gorgeous DIY Riv Turn Dollar Store supplies into a gorgeous DIY River-Rock Welcome Doormat! See my full tutorial at eHow.com :
:
:
#diyhomedecor #diydoormat #diy #ehow #diyblogger #blogger #interiordesign #diyinterior #interiordiy #frontdoor #refresh #stones #diytutorial #homedecor
Follow on Instagram

Pinterest

Visit My Eye 4 DIY's profile on Pinterest.

Categories

Subscribe to Posts Via Email

  • Email
  • Facebook
  • Instagram
  • Pinterest
  • YouTube

Copyright © 2023 My Eye 4 DIY · Design by Melanie Anne Creative · Powered By Wordpress

loading Cancel
Post was not sent - check your email addresses!
Email check failed, please try again
Sorry, your blog cannot share posts by email.